
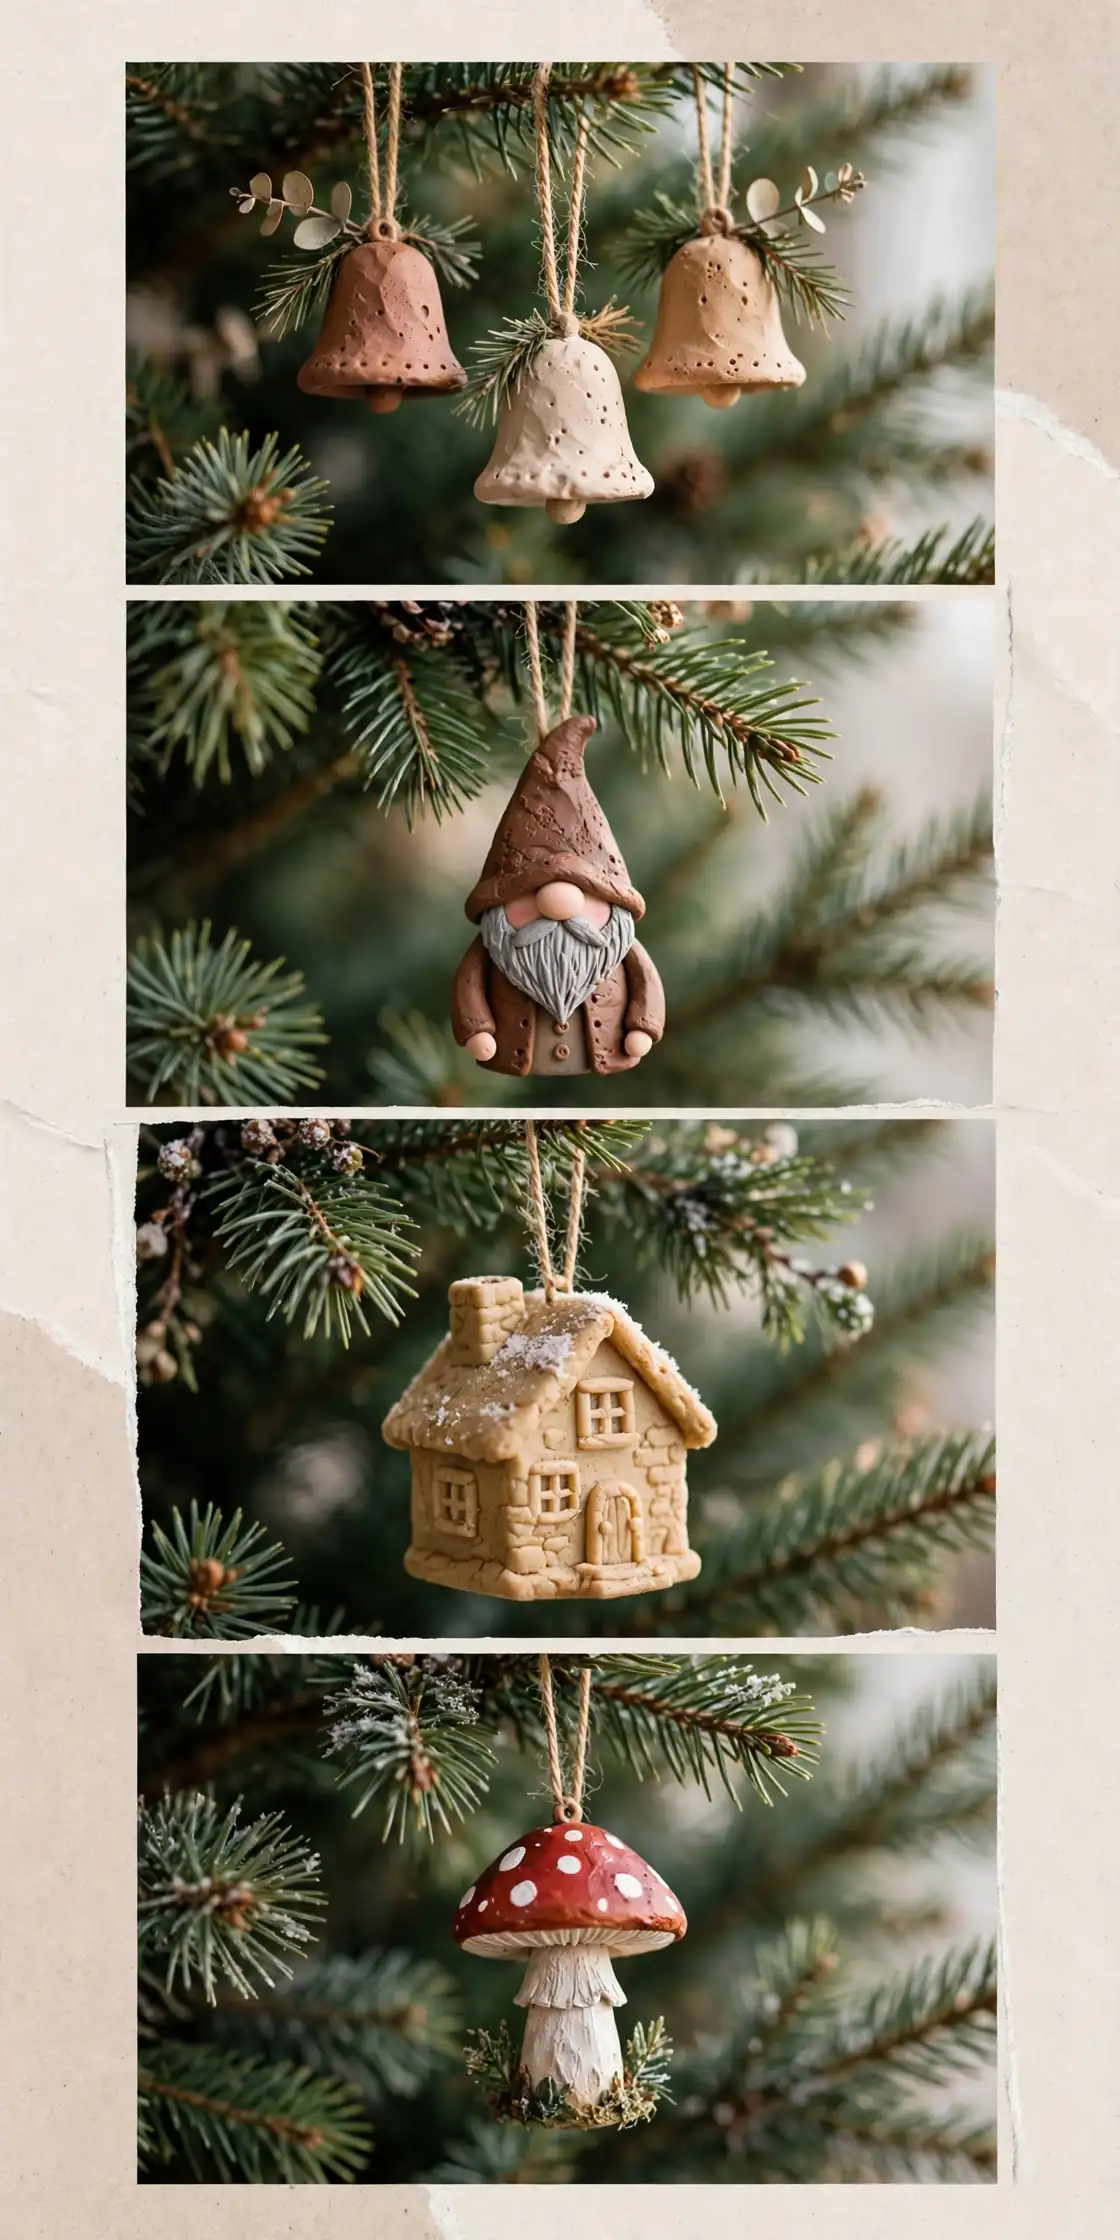
A tree dressed only with shop-bought ornaments can feel like a catalogue page, because every bauble looks the same as every other house on the street. A tree dressed with clay ornaments feels personal, because every bell, gnome, and keepsake carries a fingerprint, a brushstroke, or a shape you made yourself. Most clay christmas ornament projects fail in the same way: people shape a beautiful piece, forget the hanging hole, paint before it is dry, or hang a piece so heavy it drags the branch down, and end up with cracked ornaments and bare branches. This list works the other way around. These 22 clay christmas ornament ideas are all tree ornaments first, grouped by technique, air-dry, polymer, salt dough and baking soda, stamped and painted, and keepsake clay, and every make comes with real steps and a hanging loop, so you can pick one technique, finish a set, and hang it the same week. If you want the fullest version of this list, start with the easiest group and work toward the fiddliest, and every branch of your tree will carry something handmade by Christmas Eve, not just the front ones. For the broader ornament picture, including wooden, paper, and natural ornaments, see Christmas Ornament Ideas.
- The key takeaway: One clay type per session beats a mixed pile. A table full of finished air-dry bells or a finished set of polymer gnomes looks like a plan, while five half-dried pieces in different clays look like a mess.
- The detail most people miss: The hanging hole matters more than the shape. An ornament without a clean hole made before drying cannot hang at all, while a well-placed hole with a ribbon loop turns any clay shape into a tree ornament.
- What it costs or how long it takes: Most of these 22 ideas cost $3 to $18 in supplies, and each takes 20 minutes to 2 hours of active work plus drying or baking time. Clay christmas ornaments are often the cheapest handmade ornaments on the tree, because a single block of clay makes a whole set.
At a glance
| Group | Ideas | Materials | Best for |
|---|---|---|---|
| Air-Dry Clay Ornaments | 01-05 | Air-dry clay, cutters, paint | Bells, canes, and mittens |
| Polymer Clay Ornaments | 06-09 | Polymer clay, oven, paint | Gnomes, penguins, and figurines |
| Salt Dough and Baking Soda Ornaments | 10-13 | Flour, salt, baking soda, paint | Cottages, hearts, and icicles |
| Stamped and Painted Clay Ornaments | 14-17 | Clay, stamps, lace, paint | Pinecones, mushrooms, and bows |
| Keepsake Clay Ornaments | 18-22 | Air-dry clay, salt dough, paint | Pets, initials, and first Christmases |
Jump to an idea ↓
- 01 Air-Dry Clay Bell Ornaments
- 02 Air-Dry Clay Candy Cane Ornaments
- 03 Air-Dry Clay Mitten Ornaments
- 04 Air-Dry Clay Stocking Ornaments
- 05 Air-Dry Clay Mini Wreath Ornaments
- 06 Polymer Clay Gnome Ornaments
- 07 Polymer Clay Penguin Ornaments
- 08 Polymer Clay Cardinal Ornaments
- 09 Polymer Clay Nutcracker Ornaments
- 10 Salt Dough Cottage Ornaments
- 11 Salt Dough Heart Ornaments
- 12 Baking Soda Dove Ornaments
- 13 Baking Soda Icicle Ornaments
- 14 Stamped Clay Pinecone Ornaments
- 15 Painted Clay Mushroom Ornaments
- 16 Stamped Clay Acorn Ornaments
- 17 Painted Clay Bow Ornaments
- 18 Clay Dog Ornaments
- 19 Clay Cat Ornaments
- 20 Clay Initial Ornaments
- 21 Clay Photo Frame Ornaments
- 22 Clay First Christmas Ornaments
Air-Dry Clay Ornaments

01
Air-Dry Clay Bell Ornaments
A tree dressed only in round baubles can sound silent, because nothing on it suggests a ring or a chime. Clay bell ornaments, small clay bells with a bead clapper and a ribbon loop, give the tree a shape that looks like it should ring, because the bell curve reads instantly. Steps: 1. Roll air-dry clay to about 5 mm thick and cut bell shapes with a cutter or a knife. 2. Poke a hanging hole at the top with a straw and press a small bead into the bottom edge as a clapper before drying. 3. Dry flat for 24 to 48 hours, paint gold or red, and seal with varnish before hanging.
Try it: Hang clay bells on outer branches, not hidden inside. A clay bell tucked inside the tree disappears, while a bell on the outer branch reads as a chime from across the room.

02
Air-Dry Clay Candy Cane Ornaments
A tree dressed only in straight ornaments can look stiff, because every shape hangs in a line. Clay candy cane ornaments, hooked canes striped red and white, give the tree a curve, because the hook shape breaks the straight lines. Steps: 1. Roll two thin ropes of air-dry clay, one red-tinted and one white, and twist them together gently. 2. Bend one end into a hook and poke a hanging hole through the top of the hook with a skewer. 3. Dry flat for 24 to 48 hours, touch up the stripes with paint, and seal with varnish.
Try it: Twist the ropes loosely, not tightly. A tight twist blurs the stripes into pink, while a loose twist keeps the red and white stripes crisp.
03
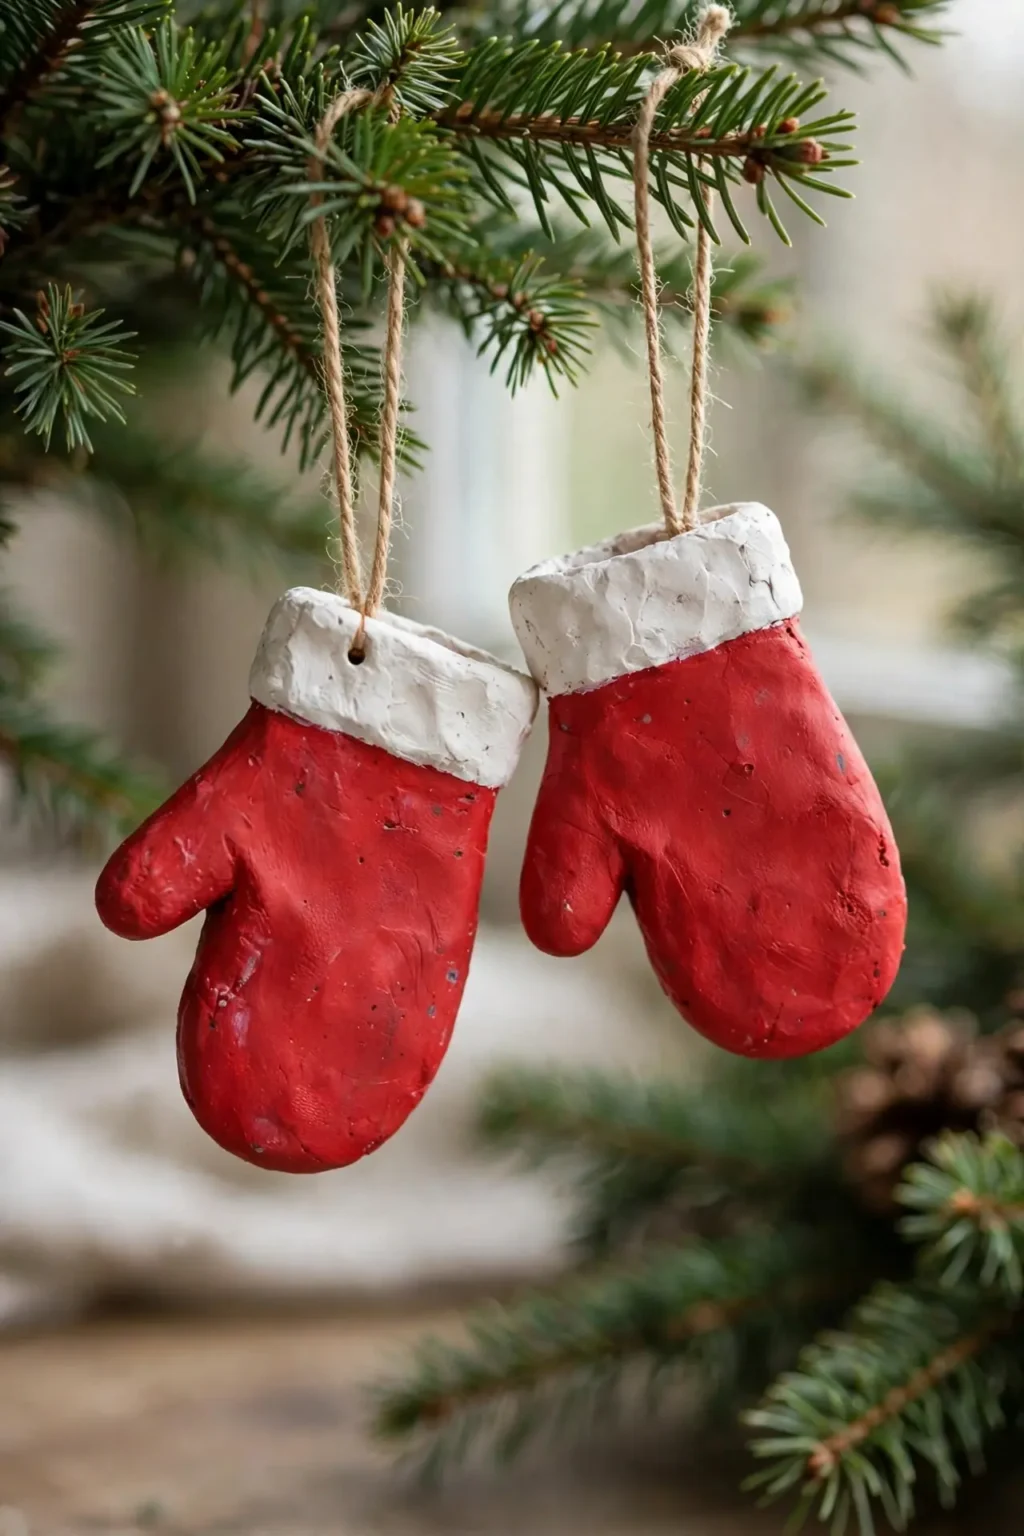
Air-Dry Clay Mitten Ornaments
A tree with only shiny ornaments can feel cold, because shine alone gives no sense of warmth. Clay mitten ornaments, small mittens with a cuff and a ribbon loop, give the tree a cosy shape, because mittens read as winter warmth. Steps: 1. Roll air-dry clay to 5 mm thick and cut mitten shapes with a cutter or a knife. 2. Press a cuff line across the wrist with a toothpick and poke a hanging hole at the top. 3. Dry flat for 24 to 48 hours, paint in one colour family with a white cuff, and seal.
Try it: Make mittens in pairs, not singles. A single clay mitten looks lost on the tree, while a pair hung together reads as a set.
04
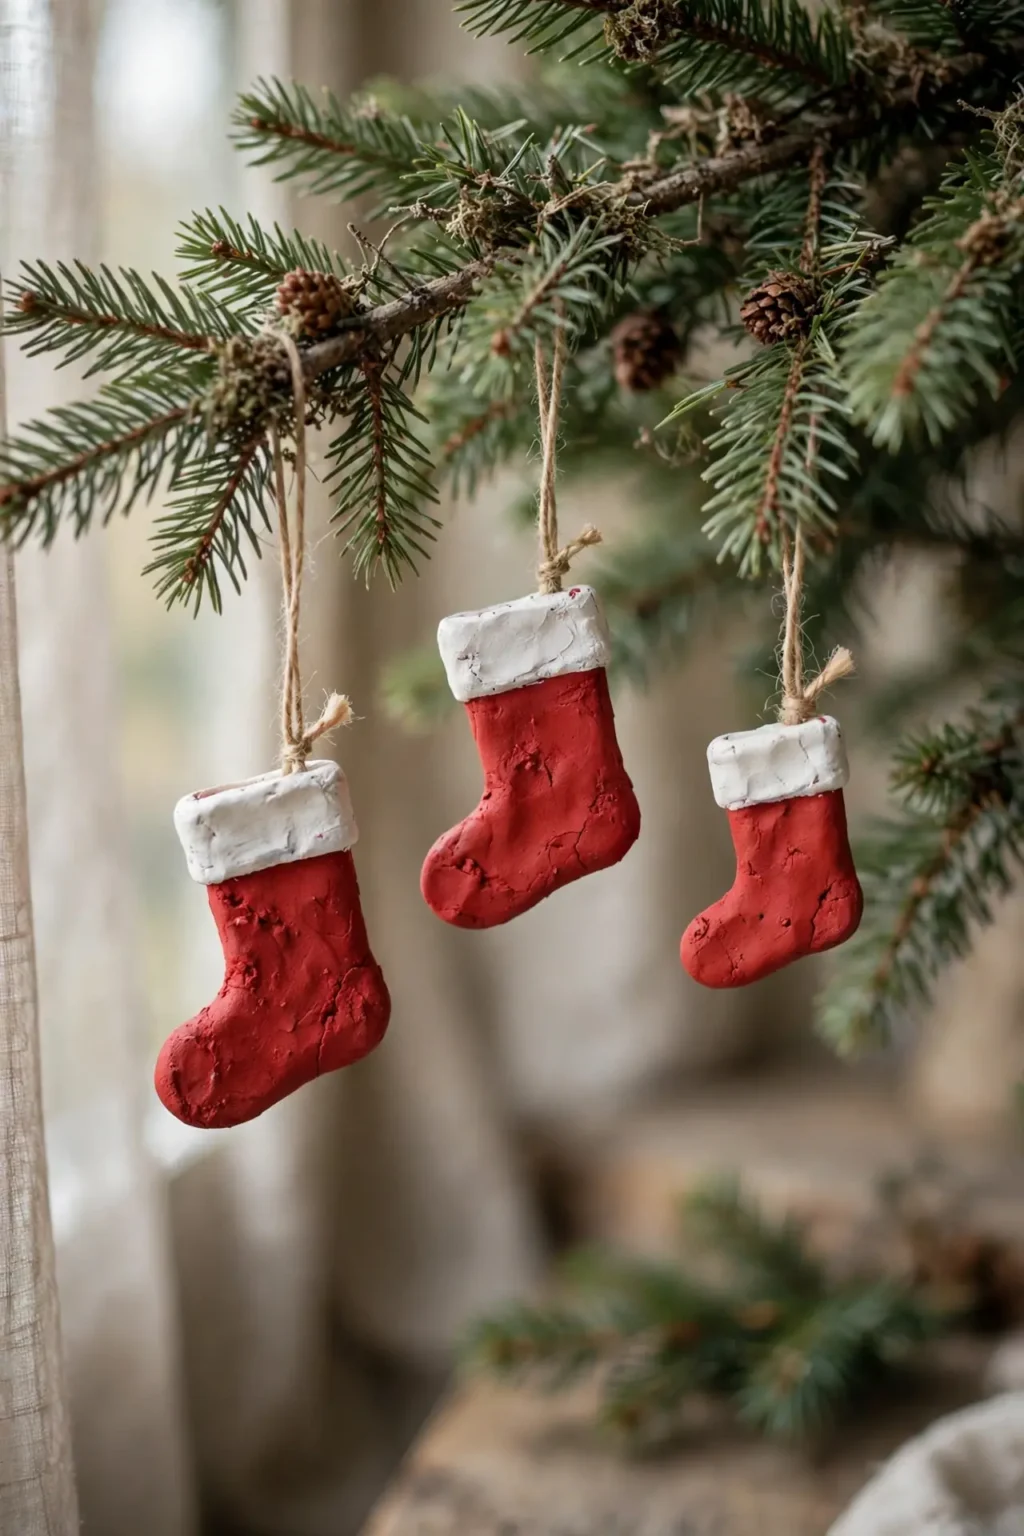
Air-Dry Clay Stocking Ornaments
A tree topped with a star and covered in baubles can feel like it forgot the stockings, because stockings are the shape children look for on Christmas morning. A clay stocking ornament, a small stocking with a cuff and a heel, hangs as a miniature of the real thing, because the shape is unmistakable. Steps: 1. Roll air-dry clay to 5 mm thick and cut stocking shapes with a cutter or a knife. 2. Press a cuff line near the top and a heel line near the foot with a toothpick, and poke a hanging hole at the top. 3. Dry flat for 24 to 48 hours, paint red with a white cuff, and seal with varnish.
Try it: Keep clay stockings small, no taller than 8 cm. A large clay stocking is heavy and pulls the branch down, while a small one hangs neatly.
05
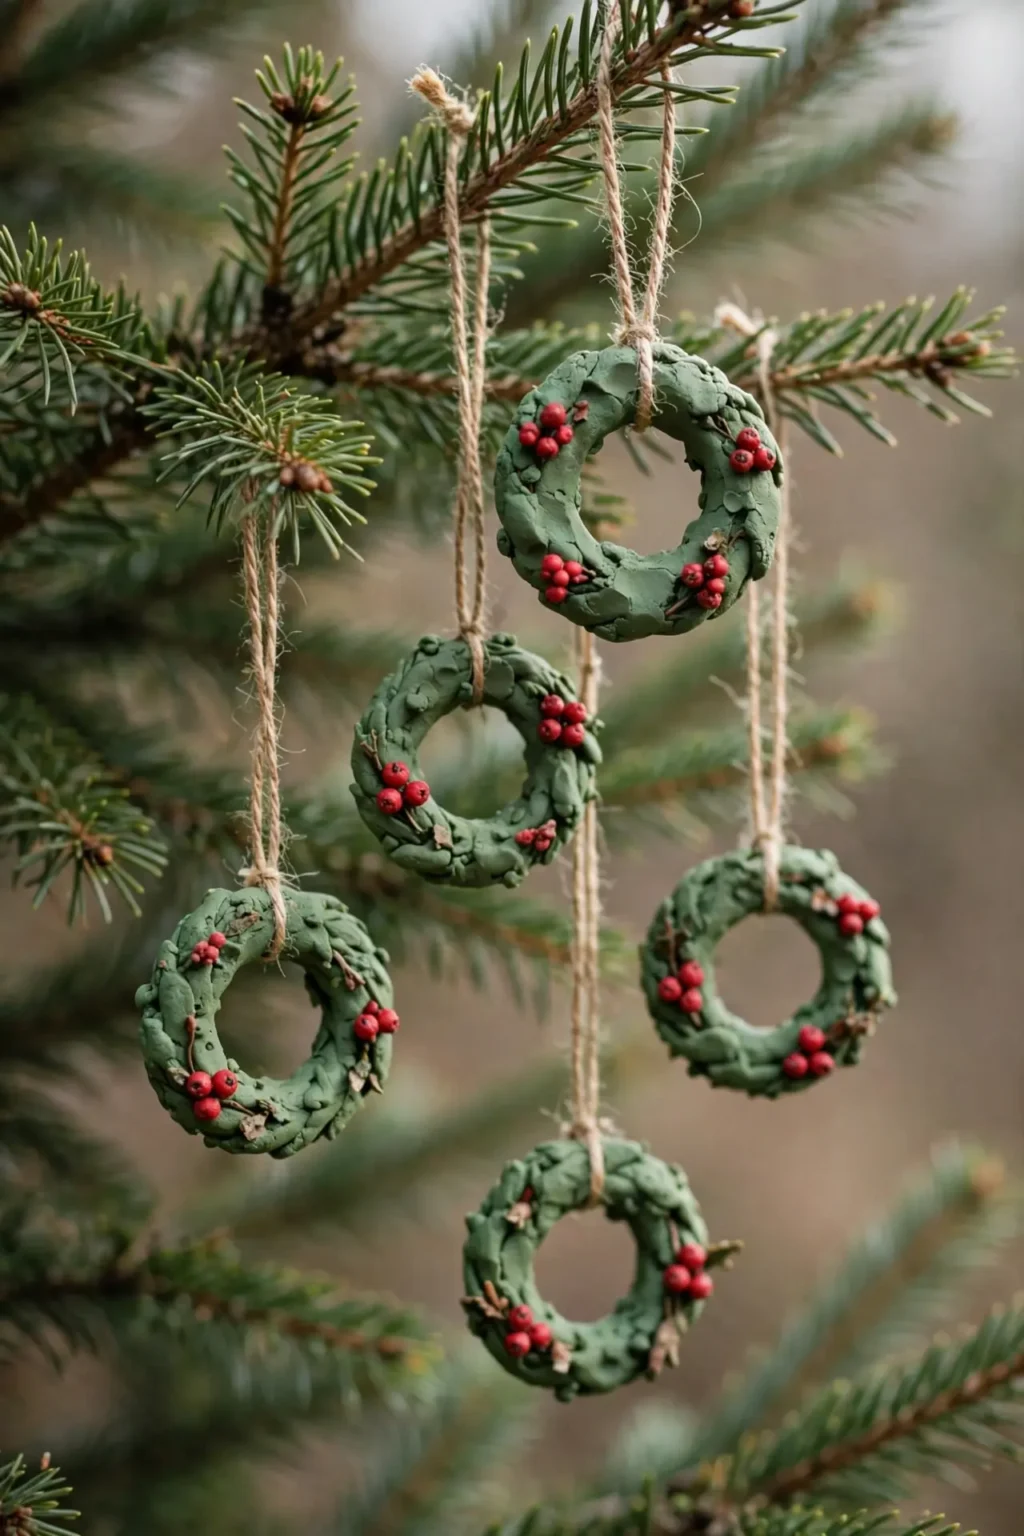
Air-Dry Clay Mini Wreath Ornaments
A tree dressed only with single shapes can look scattered, because nothing on it frames a space. Clay mini wreath ornaments, small clay rings with leaves and berries, give the tree tiny frames, because the ring shape reads as a wreath even at small size. Steps: 1. Roll air-dry clay into a thin rope and join the ends into a ring about 6 cm across. 2. Press small leaf shapes and tiny berry balls around the ring and poke a hanging hole at the top. 3. Dry flat for 24 to 48 hours, paint the leaves green and the berries red, and seal.
Try it: Glue the ring join well before drying, not after. A ring joined after drying snaps at the seam, while a ring joined while soft dries as one piece.
Polymer Clay Ornaments

06
Polymer Clay Gnome Ornaments
A tree with only classic shapes can feel predictable, because stars and baubles repeat every year. Polymer clay gnome ornaments, small gnomes with tall hats and beards, give the tree a character guests ask about, because the gnome shape is funny and unmistakable. Steps: 1. Shape a cone of grey or white polymer clay for the beard and body, and a tall pointed hat in red or green. 2. Add a small round nose where the hat meets the beard. 3. Poke a hanging hole through the hat, bake following the packet instructions, cool fully, then seal.
Try it: Make the hat tall and the body short. A gnome with a short hat looks like a cone, while a gnome with a tall hat reads as a gnome at a glance.

07
Polymer Clay Penguin Ornaments
A tree dressed only in warm colours can feel one-note, because reds and golds repeat everywhere. Polymer clay penguin ornaments, black and white penguins with orange beaks, give the tree a cool contrast, because the black and white reads sharply against the green. Steps: 1. Shape a black polymer clay oval for the body and press a white oval onto the front as a belly. 2. Add a small orange beak, two black dot eyes, and two flat wings at the sides. 3. Poke a hanging hole through the top, bake following the packet instructions, and cool fully before hanging.
Try it: Keep polymer penguins small, no taller than 5 cm. A large polymer penguin is heavy and pulls the branch down, while a small one hangs neatly.
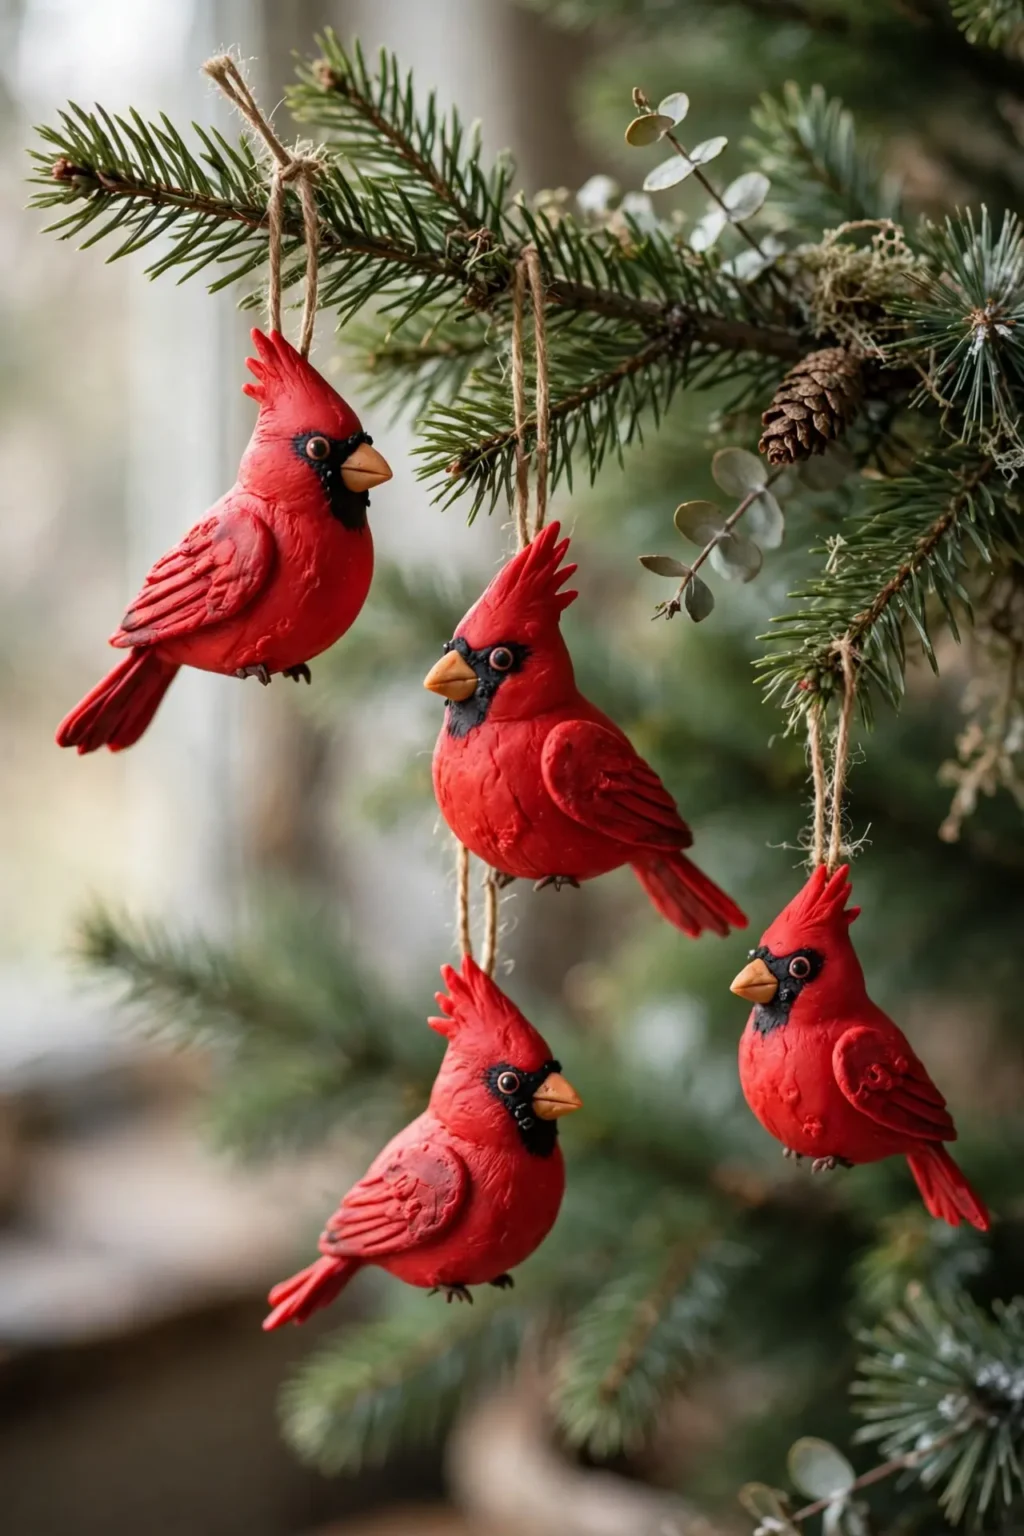
08
Polymer Clay Cardinal Ornaments
A tree with only abstract shapes can feel like it forgot the birds, because birds are the living detail of a winter tree. A polymer clay cardinal ornament, a bright red bird with a crest and a black face mask, gives the tree a flash of colour, because the red reads from across the room. Steps: 1. Shape a red polymer clay body with a pointed crest on top of the head. 2. Add a black face mask, an orange beak, and a flat tail. 3. Poke a hanging hole through the top, bake following the packet instructions, cool fully, then seal.
Try it: Hang cardinals on outer branches near the lights. A cardinal hidden inside the tree disappears, while a cardinal near a light glows red.

09
Polymer Clay Nutcracker Ornaments
A tree dressed only in soft shapes can feel gentle, because nothing on it stands at attention. A polymer clay nutcracker ornament, a small soldier with a tall hat and a jacket, gives the tree a figure with presence, because the uniform shape reads as a guard. Steps: 1. Shape a polymer clay body in a jacket colour, with a tall black hat and a white belt. 2. Add dot eyes, a moustache, and gold buttons. 3. Poke a hanging hole through the hat, bake following the packet instructions, cool fully, then paint the details.
Try it: Paint the nutcracker details after baking, not before. Paint applied before baking can darken in the oven, while paint applied after baking stays crisp.
Salt Dough and Baking Soda Ornaments
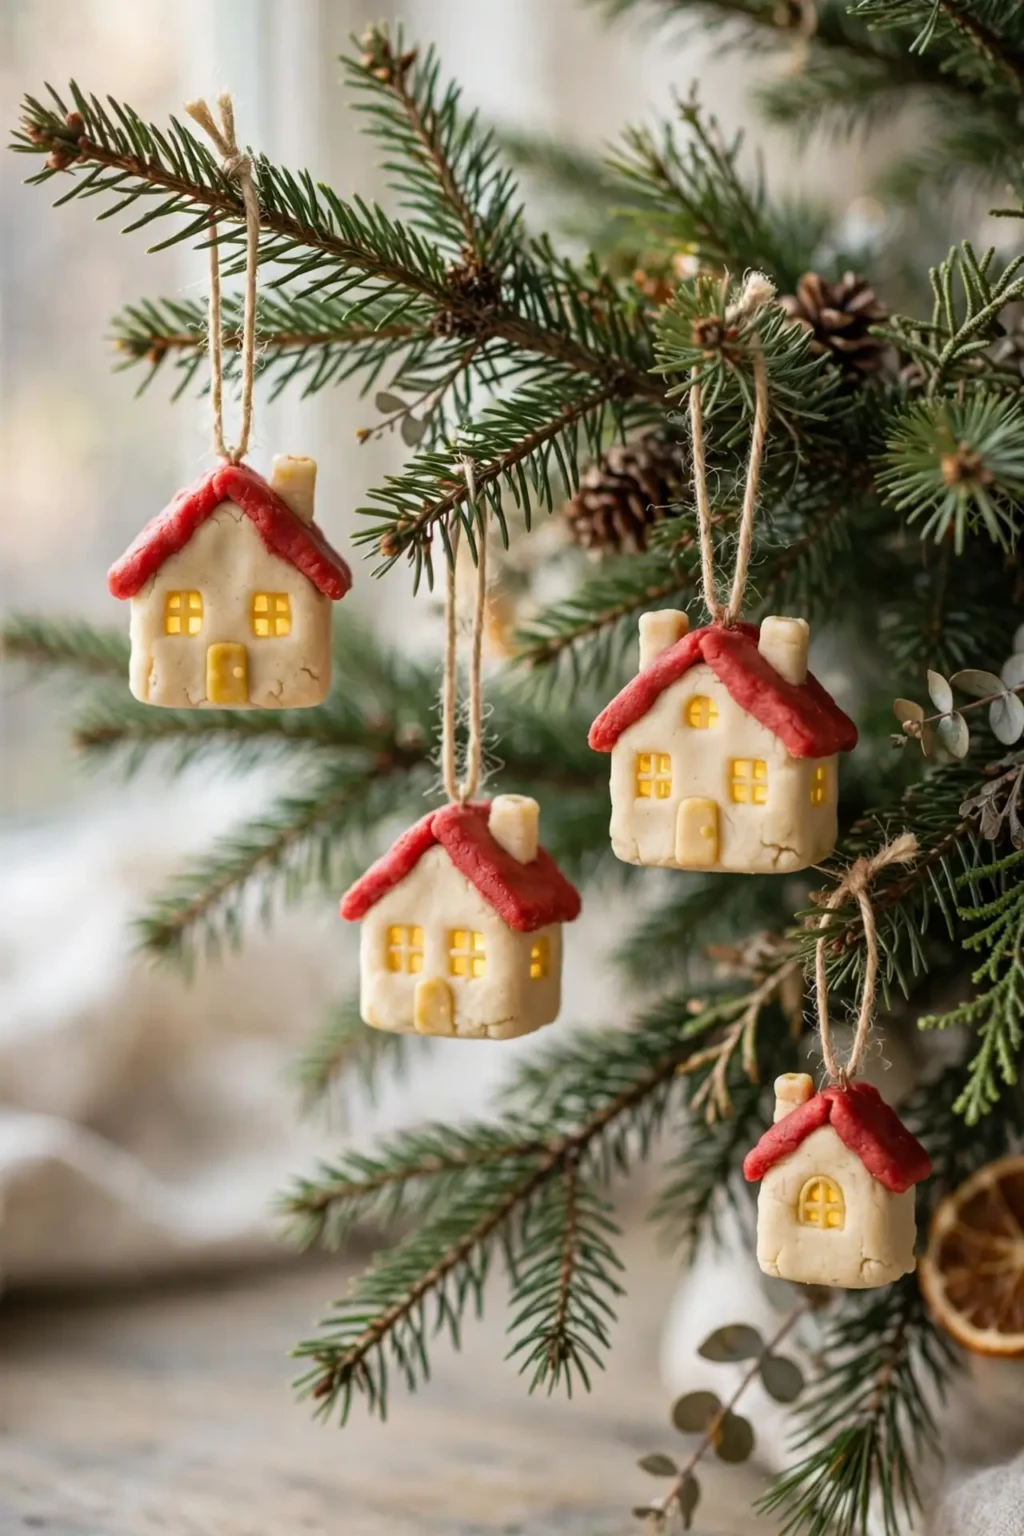
10
Salt Dough Cottage Ornaments
A tree dressed only with flat ornaments can look two-dimensional, because flat shapes have no depth. Salt dough cottage ornaments, small houses with pitched roofs and glowing windows, give the tree tiny buildings, because the house shape reads instantly. Steps: 1. Mix 2 cups of flour, 1 cup of salt, and 1 cup of water into a smooth dough and roll to 5 mm thick. 2. Cut house shapes with a cutter or a knife and poke a hanging hole at the roof peak. 3. Bake at a low oven temperature until hard, cool fully, then paint the walls cream and the roof red, with yellow windows.
Try it: Bake salt dough low and slow, not hot and fast. A hot oven puffs and cracks salt dough, while a low oven dries it hard and flat.

11
Salt Dough Heart Ornaments
A tree dressed only in Christmas symbols can feel formal, because stars and trees repeat without a personal note. Salt dough heart ornaments, hearts painted red with a name or a year, give the tree a personal touch, because hearts read as love. Steps: 1. Roll salt dough to 5 mm thick and cut hearts with a cookie cutter. 2. Poke a hanging hole at the top of each heart with a straw. 3. Bake low until hard, cool fully, then paint red and write a name or the year in white paint.
Try it: Write the name after the red coat is fully dry. A name written onto wet red smears, while a name on dry red stays crisp.
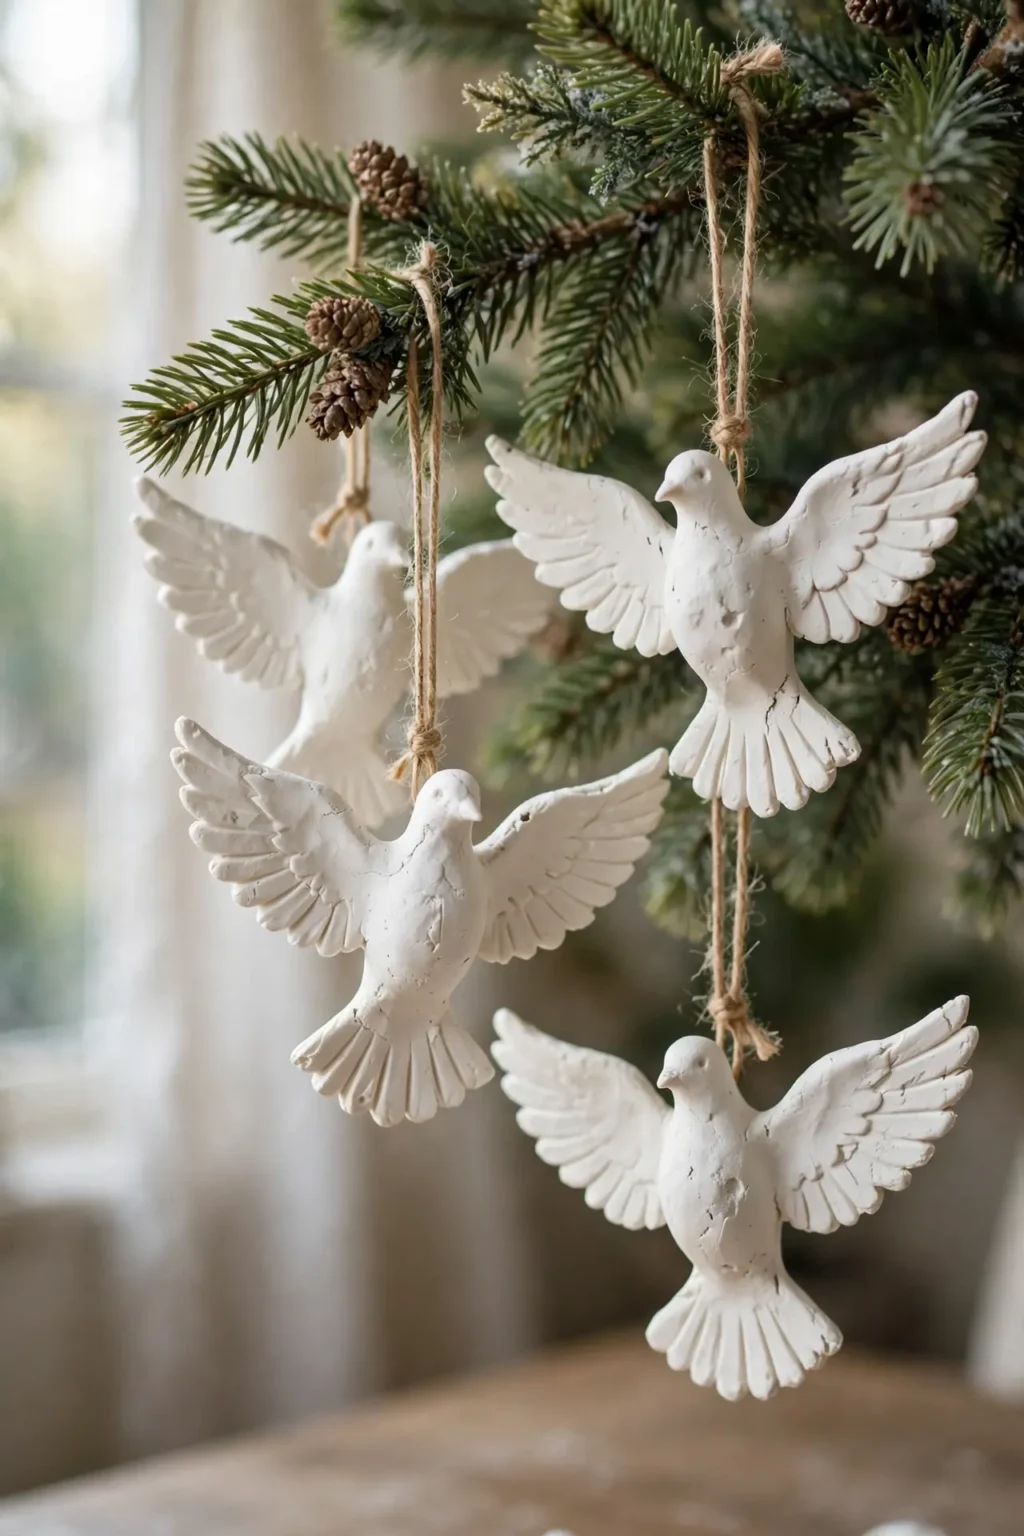
12
Baking Soda Dove Ornaments
A tree dressed only in coloured ornaments can feel busy, because colour repeats everywhere. Baking soda dove ornaments, pure white doves with spread wings, give the tree a calm shape, because the white clay reads as peace against the green. Steps: 1. Mix 1 cup of baking soda, half a cup of cornstarch, and three quarters of a cup of water, and cook on low until the mixture forms a dough. 2. Roll to 5 mm thick, cut dove shapes, and poke a hanging hole at the top. 3. Air dry for 24 to 48 hours, then leave white or add a touch of gold paint on the wing edge, and seal.
Try it: Roll baking soda clay on baking paper, not straight on the table. Baking soda clay rolled on a bare table sticks and tears when you lift it, while clay on baking paper lifts cleanly.
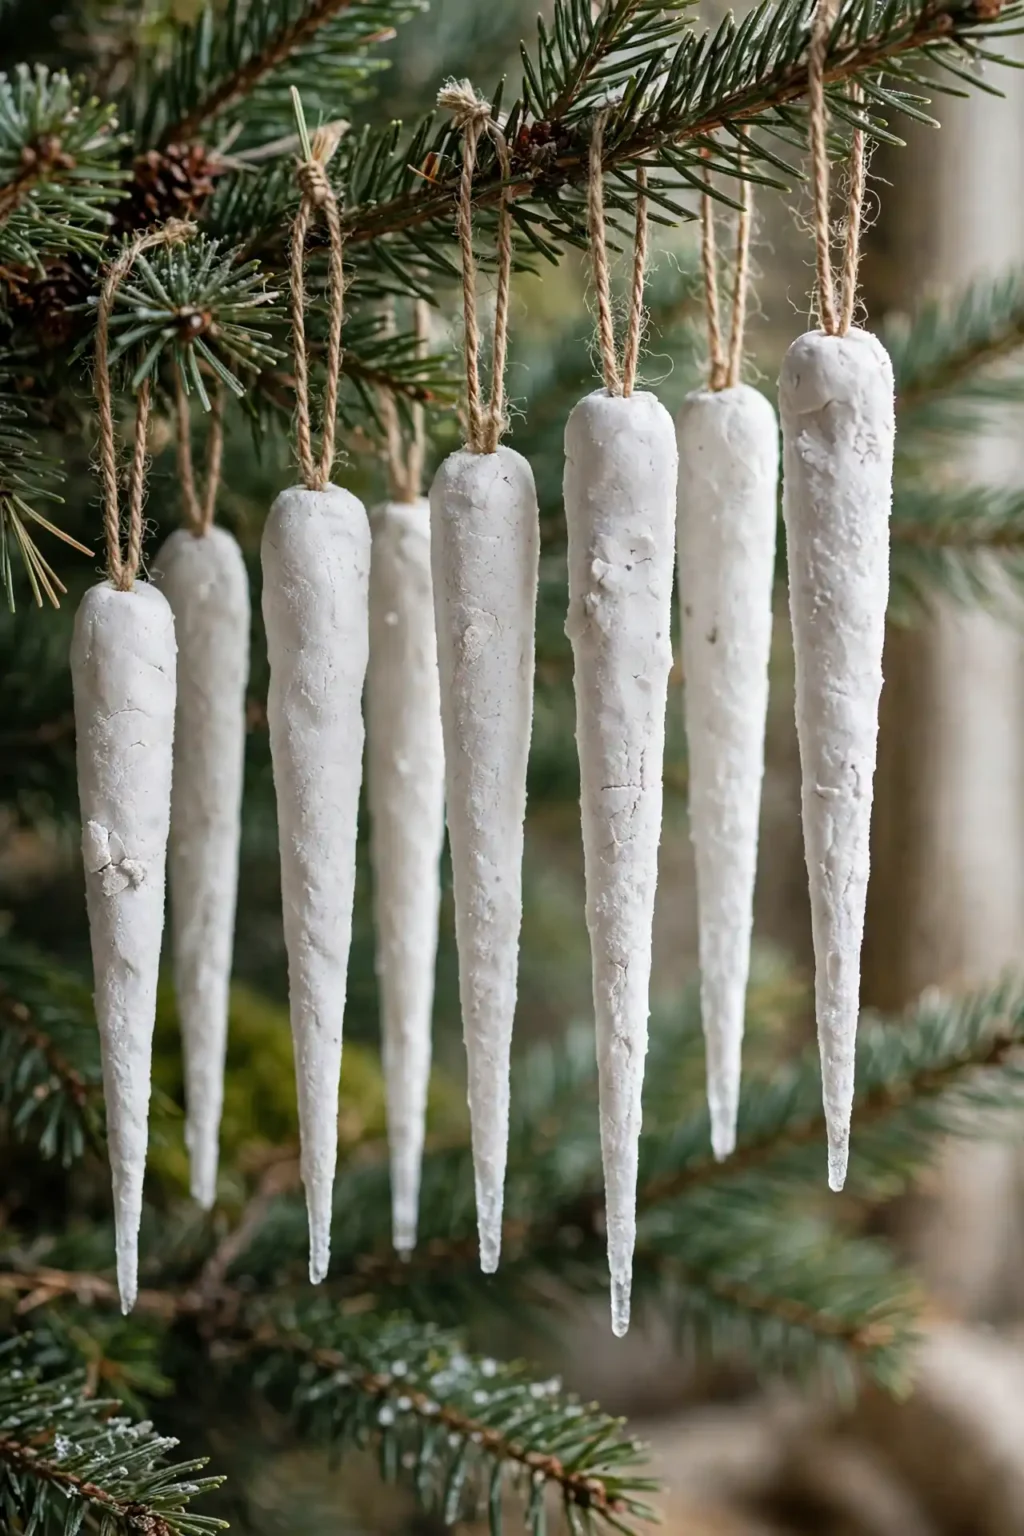
13
Baking Soda Icicle Ornaments
A tree dressed only in round ornaments can look soft, because every shape is curved. Baking soda icicle ornaments, long tapered drops with a frosted finish, give the tree sharp points, because the icicle shape breaks the curves. Steps: 1. Roll baking soda clay into long tapered drops, thick at the top and pointed at the bottom. 2. Twist each drop slightly for a frozen look and poke a hanging hole through the thick end. 3. Air dry for 24 to 48 hours, brush with white paint mixed with a little glitter, and seal.
Try it: Hang icicles at different lengths, not all the same. Icicles in one length look like a row, while icicles in mixed lengths read as real frost.
Stamped and Painted Clay Ornaments
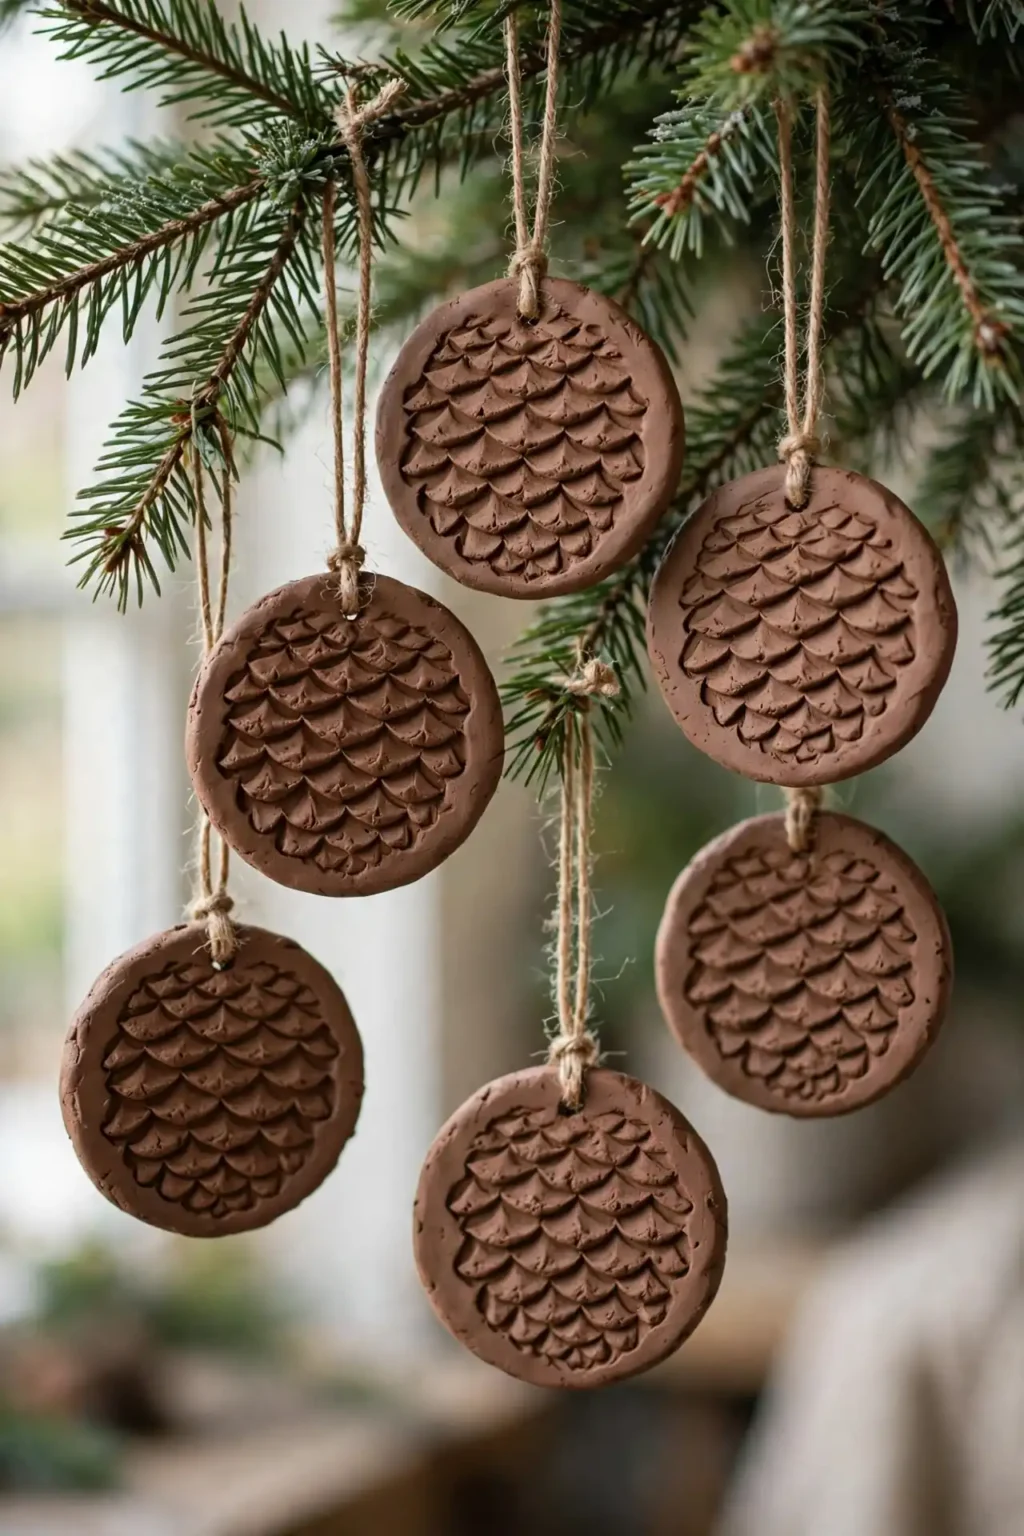
14
Stamped Clay Pinecone Ornaments
A tree dressed only in smooth ornaments can feel flat, because smooth surfaces catch no shadow. Stamped clay pinecone ornaments, discs pressed with a pinecone scale pattern, give the tree texture, because the stamped scales catch light and shadow. Steps: 1. Roll air-dry clay to 5 mm thick and cut circles. 2. Press a real pinecone scale, a stamp, or a fork lightly into each circle in overlapping rows. 3. Poke a hanging hole, dry flat for 24 to 48 hours, then paint brown with a lighter dry brush on the raised scales, and seal.
Try it: Press the texture in before cutting, not after. A disc pressed after cutting stretches out of shape, while a sheet pressed first cuts cleanly.
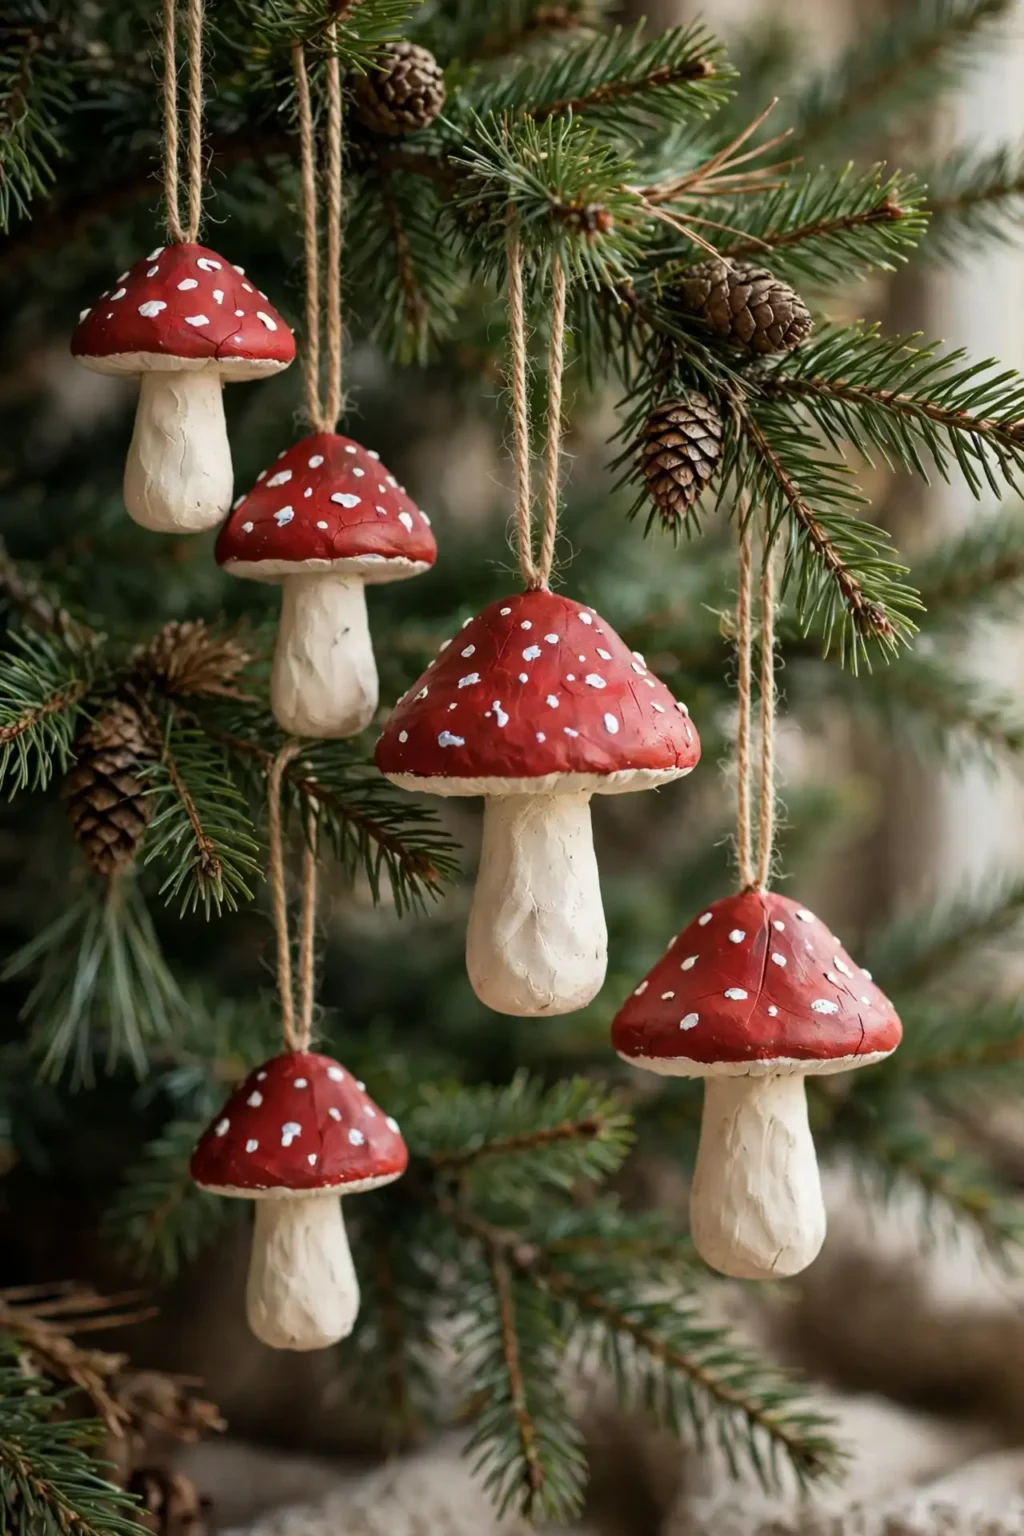
15
Painted Clay Mushroom Ornaments
A tree dressed only in traditional shapes can feel predictable, because stars and bells repeat every year. Painted clay mushroom ornaments, red-capped mushrooms with white dots, give the tree a woodland surprise, because the mushroom shape is unexpected on a tree. Steps: 1. Shape a clay stem and a domed cap, and join them while soft. 2. Poke a hanging hole through the cap and dry or bake following the clay instructions. 3. Paint the cap red with white dots and the stem cream, then seal with varnish.
Try it: Paint the white dots after the red coat is fully dry. Dots painted onto wet red smear into pink, while dots on dry red stay crisp.

16
Stamped Clay Acorn Ornaments
A tree dressed only in large ornaments can feel heavy, because big shapes dominate the branches. Stamped clay acorn ornaments, small acorns with a textured cap, give the tree tiny woodland detail, because the acorn shape reads as autumn meeting Christmas. Steps: 1. Shape small clay acorn bodies and press a textured cap onto each with a stamp or a piece of burlap. 2. Poke a hanging hole through the cap and dry or bake following the clay instructions. 3. Paint the body tan and the cap brown, then seal.
Try it: Keep acorns small, no taller than 4 cm. A large clay acorn is heavy for its size, while a small one hangs neatly among the branches.
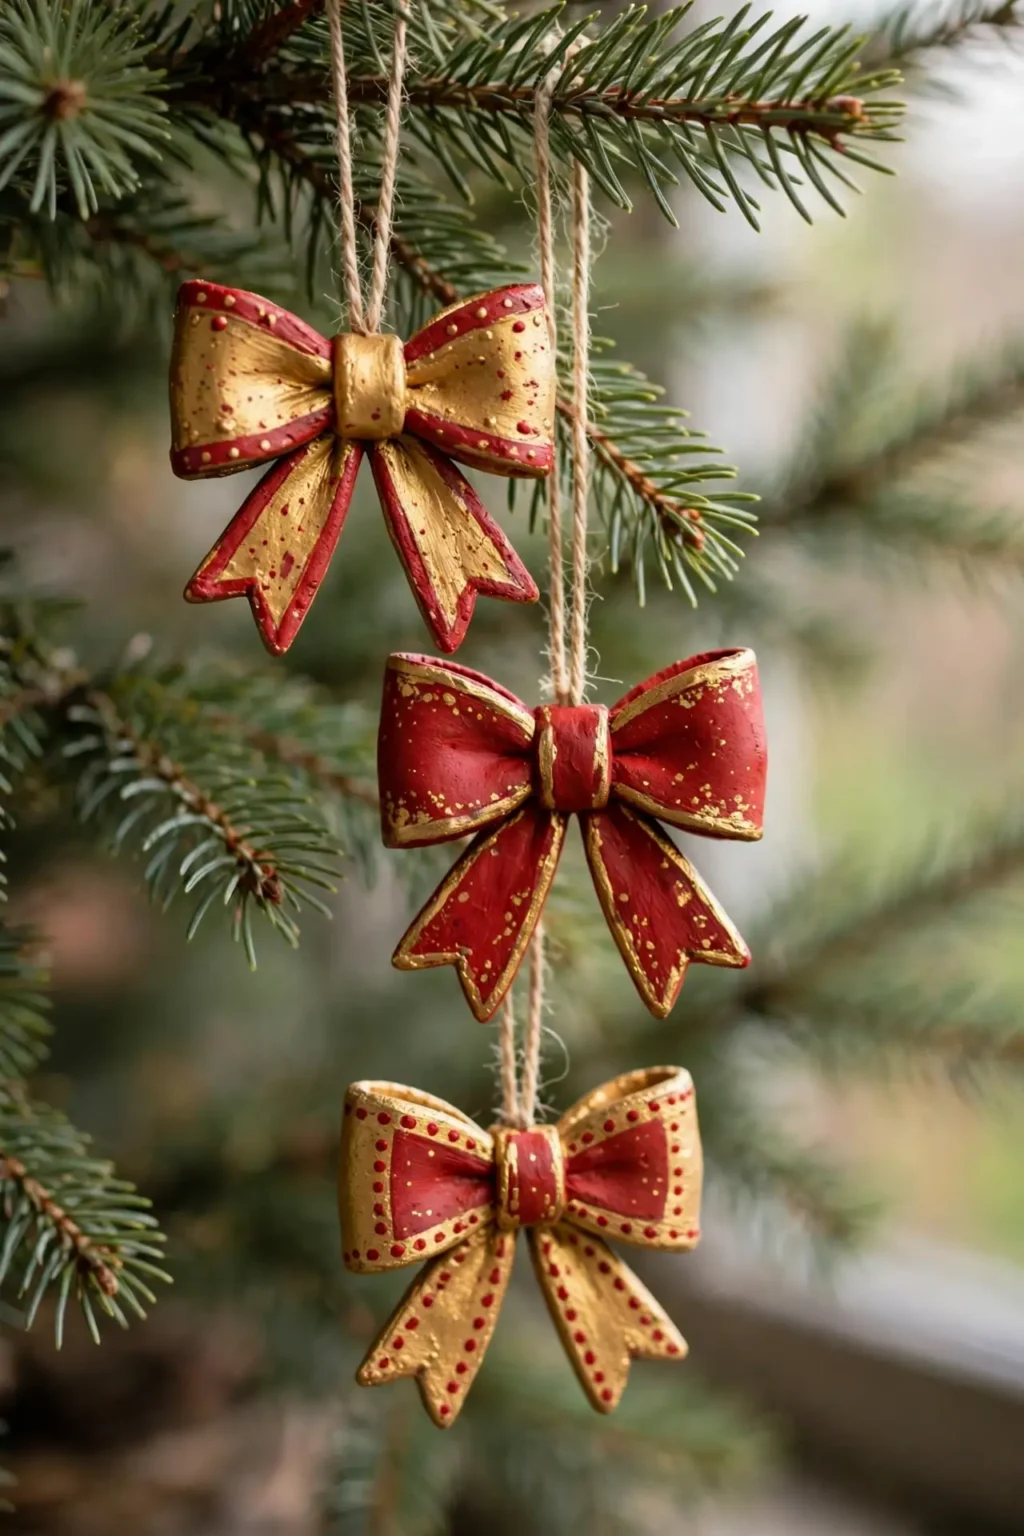
17
Painted Clay Bow Ornaments
A tree dressed only in solid ornaments can look plain, because nothing on it suggests a gift. Painted clay bow ornaments, bows with loops and tails, give the tree the look of wrapped presents, because the bow shape reads as celebration. Steps: 1. Shape two clay loops and two tails, and join them at the centre with a small knot piece. 2. Poke a hanging hole through the knot and dry or bake following the clay instructions. 3. Paint the bow red or gold, then seal with varnish.
Try it: Join the loops while the clay is soft, not after drying. Loops joined after drying snap at the seam, while loops joined while soft dry as one piece.
Keepsake Clay Ornaments
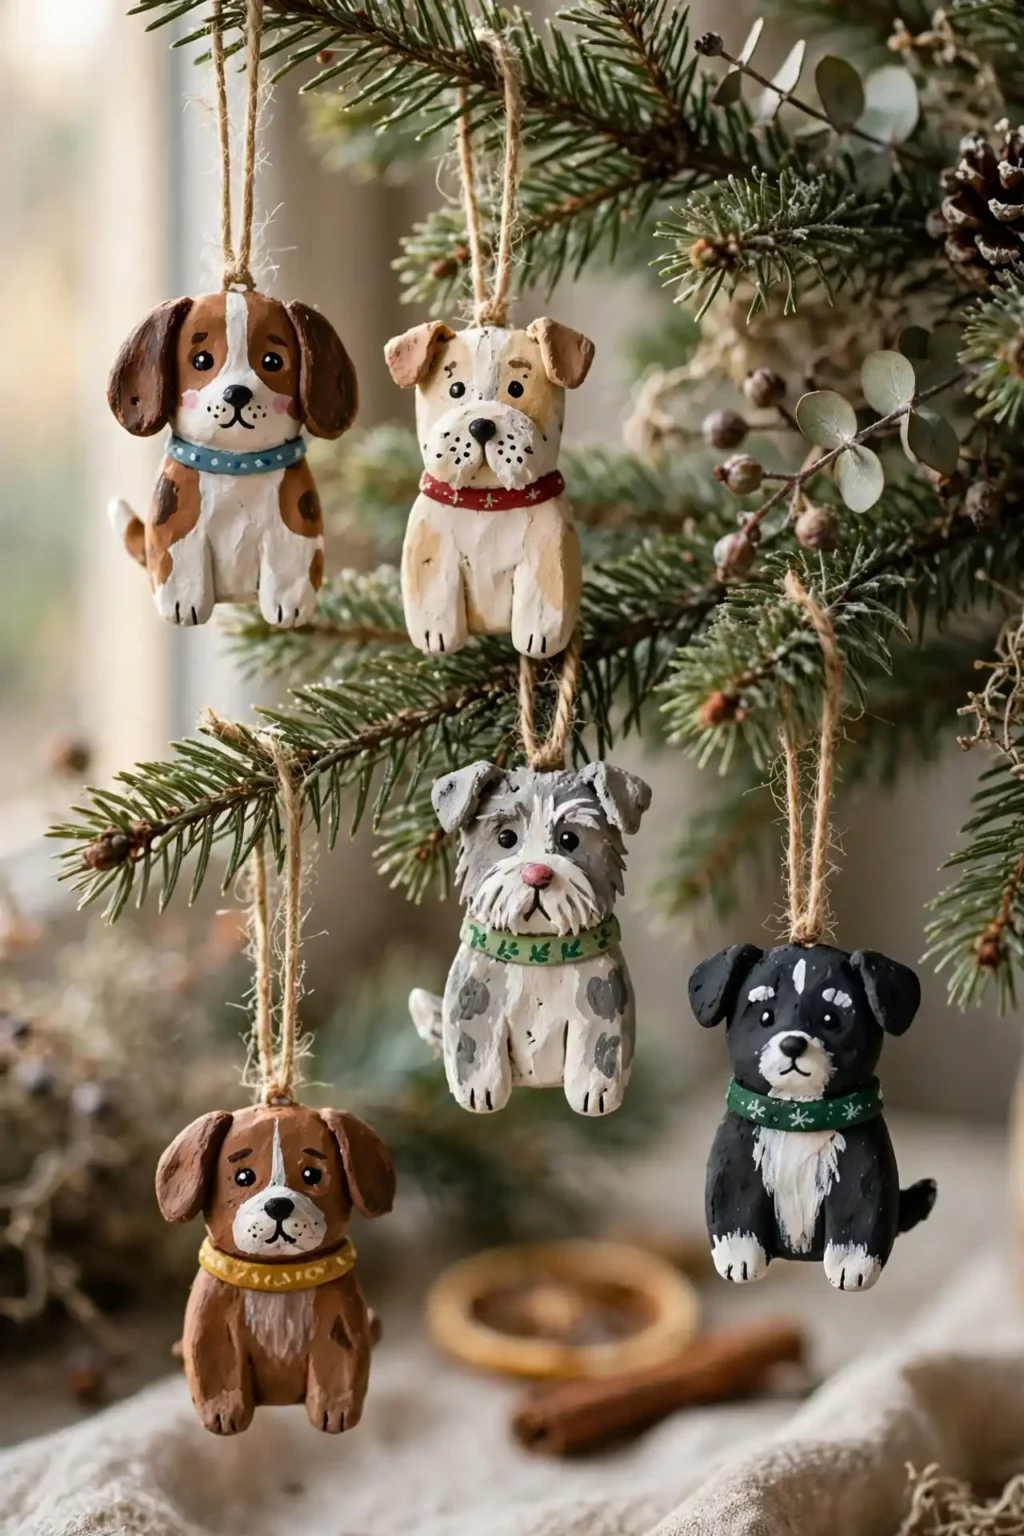
18
Clay Dog Ornaments
A tree that celebrates the whole family can feel incomplete if the pets are left out, because pets are family too. Clay dog ornaments, small dogs shaped in clay with a name painted on the back, give the tree ornaments that include every member of the house. Steps: 1. Shape a simple clay dog from a body oval, a head ball, ears, and a tail, using a reference photo for the breed shape. 2. Poke a hanging hole through the top and dry or bake following the clay instructions. 3. Paint the dog in the pet’s colours, write the pet’s name on the back, and seal.
Try it: Keep the dog simple, not detailed. A simple clay dog reads as charming, while a fiddly one that fails reads as broken.
19
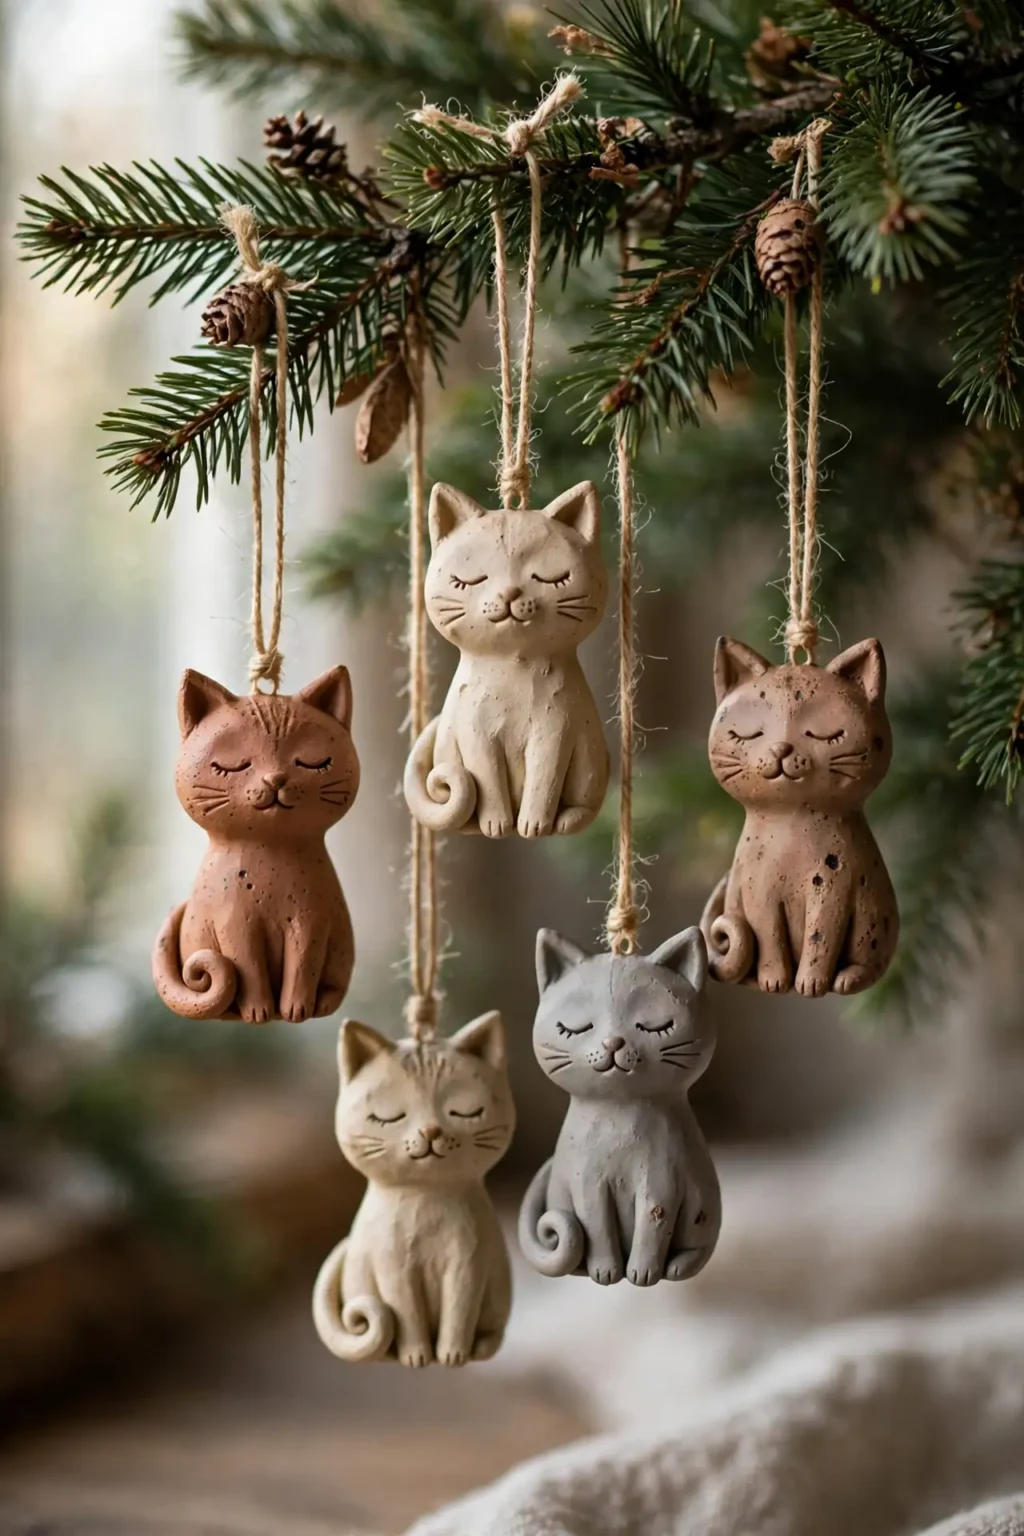
Clay Cat Ornaments
A tree with only dogs can feel one-sided, because cat families look for their own pets too. Clay cat ornaments, small cats with pointed ears and a curled tail, give the tree ornaments for cat households, because the cat shape is unmistakable. Steps: 1. Shape a clay cat from a body oval, a head ball, two pointed ears, and a curled tail. 2. Poke a hanging hole through the top and dry or bake following the clay instructions. 3. Paint the cat in the pet’s colours, add whisker dots, write the pet’s name on the back, and seal.
Try it: Paint the whiskers last, after all other paint is dry. Whiskers painted early get smudged by later coats, while whiskers painted last stay fine and crisp.

20
Clay Initial Ornaments
A tree dressed only with generic ornaments can feel impersonal, because nothing on it names anyone in the house. Clay initial ornaments, letters cut from clay and painted in one colour family, give the tree ornaments that name every member of the family, because the letter is personal. Steps: 1. Roll air-dry clay to 5 mm thick and cut one letter per family member with a letter cutter or a knife. 2. Poke a hanging hole at the top of each letter. 3. Dry flat for 24 to 48 hours, paint in one colour family, and seal with varnish.
Try it: Paint all the initials in one colour family, all reds or all golds. Initials in mixed colours look like a classroom project, while one family reads as a set.

21
Clay Photo Frame Ornaments
A tree dressed only with new ornaments can feel like it forgot the past, because old photos stay in albums. Clay photo frame ornaments, small clay frames holding a tiny photo, give the tree ornaments that carry memories, because the photo is the point. Steps: 1. Shape a small clay frame, slightly larger than the photo, and press a border pattern into it. 2. Poke a hanging hole at the top and dry or bake following the clay instructions. 3. Paint the frame gold or red, seal it, then glue a small printed photo behind the opening and add a backing card.
Try it: Seal the frame before adding the photo, not after. Sealant on a photo clouds it, while a sealed frame keeps the photo clear.

22
Clay First Christmas Ornaments
A baby’s first Christmas deserves an ornament that says so, because the first year only happens once. Clay first christmas ornaments, discs stamped with “Baby’s First Christmas” and the year, give the tree ornaments that mark the milestone, because the words and the year are the keepsake. Steps: 1. Roll air-dry clay to 5 mm thick and cut circles about 8 cm across. 2. Stamp “Baby’s First Christmas” and the year into each disc with letter stamps, and poke a hanging hole at the top. 3. Dry flat for 24 to 48 hours, paint white or cream with gold lettering, and seal.
Try it: Stamp the words before the clay dries, not after. Words stamped into soft clay stay readable, while words scratched into dry clay look rough.
Pro tip: Finish one clay type completely before starting the next. A table full of finished air-dry bells, a finished set of polymer gnomes, and a finished salt dough cottage set make the house feel done, while five half-dried pieces in different clays make it feel chaotic, even if you spent the same hours.
Three rules for clay ornaments that look intentional, not homemade
Most clay Christmas ornaments look unfinished for the same three reasons, and all three are fixable.
- First, limit the palette. One or two colours per project, repeated consistently, look intentional, while a project in unrelated colours looks like leftovers.
- Second, finish every edge. Smooth edges, sealed paint, and trimmed holes are what separate a clay ornament from a lump of clay, because the finish is what the eye reads first.
- Third, respect the drying time and the weight. Clay that is painted, sealed, or hung before it is fully dry cracks and warps, and a heavy ornament drags its branch down, so plan the drying days into the project and keep ornaments light enough to hang.
Storing and reusing your clay Christmas ornaments
Clay Christmas ornaments last for years if you store them properly, and the storage step is part of the making, not an afterthought.
- First, store ornaments in their own boxes. Clay ornaments chip against each other, so tissue paper and a box per shape are worth the minute they take.
- Second, store flat pieces flat. Stamped discs, initials, and photo frames warp when stacked on edge, so keep them flat between sheets of card in a folder.
- Third, keep clay dry and away from damp. Clay softens, spots, and grows mould in a damp attic, so store clay ornaments in a dry cupboard, and keep them away from direct sunlight, which fades colour over time.
Questions readers ask
What are the easiest clay christmas ornaments for beginners?
The easiest clay christmas ornaments for beginners are air-dry clay bells, mittens, and salt dough hearts, because all three need only clay, a cutter, and paint, and mistakes hide easily under more paint. Start with bells, since one rolled sheet makes a whole set of ornaments in under an hour plus drying time.
How do I make clay christmas ornaments?
You make clay christmas ornaments by choosing one clay type, air-dry, polymer, salt dough, or baking soda clay, and following its steps with the right drying or baking method for the job. A making clay ornaments project starts with rolling the clay evenly, cutting clean shapes, and poking hanging holes before drying, since holes poked after drying crack the ornament.
What clay is best for Christmas ornaments?
Air-dry clay is best for simple ornaments and keepsakes, polymer clay is best for detailed ornaments and figurines, and salt dough is best for cheap kids projects, because each clay suits a different level of detail and budget. Using the right clay for the project is the single biggest difference between an ornament that works and one that cracks.
Can kids make clay Christmas ornaments?
Yes, kids can make clay Christmas ornaments, and the best projects are air-dry bells, mittens, and salt dough hearts, plus stamped discs, because all of them are safe, forgiving, and genuinely useful as tree ornaments. Keep ovens, craft knives, and hot glue for adults, and let children choose colours and placements.
How long do clay Christmas ornaments take to dry?
Air-dry clay ornaments take 24 to 48 hours to dry fully, depending on thickness, while polymer clay ornaments bake in under an hour following the packet instructions. A clay ornament that feels dry on the outside can still be damp inside, so wait the full drying time before painting or sealing.
Do I need to seal clay Christmas ornaments?
Yes, you should seal clay Christmas ornaments with varnish or a clear sealant, because sealing protects the paint, stops moisture damage, and keeps the ornament looking new for years. Air-dry and salt dough ornaments need sealing most, while polymer clay ornaments benefit from a light seal as well.
What is the difference between air-dry clay and polymer clay?
Air-dry clay hardens by drying in the air over 24 to 48 hours and suits simple ornaments and keepsakes, while polymer clay hardens by baking in an oven and suits detailed ornaments and figurines. Air-dry clay is cheaper and easier for kids, while polymer clay holds finer detail and is stronger once baked.
How do I store clay Christmas ornaments so they last?
You store clay Christmas ornaments so they last by keeping ornaments in their own tissue-lined boxes, storing flat pieces flat between sheets of card, and keeping everything in a dry cupboard away from damp and sunlight. Stored this way, clay ornaments, keepsakes, and stamped discs will last for many seasons.
People Also Ask
What is the 70/30 rule for clay Christmas ornaments?
The 70/30 rule for clay Christmas ornaments means roughly 70 percent of the tree stays as it is, and 30 percent carries clay ornaments. The rule is a guide, not a law, but a tree that follows it will read as festive rather than cluttered.
How do I make my clay ornaments look shop bought, not homemade?
You make your clay ornaments look shop bought, not homemade, by rolling evenly, smoothing every edge, sealing the paint, and keeping one palette across each project. An ornament with smooth edges, sealed paint, and a clear palette reads as designed, while rough edges and unsealed paint read as a school project.
What clay Christmas ornaments should beginners avoid?
Beginners should avoid detailed polymer figurines and tiny stamped acorns on a first attempt, because each of those needs precise shaping or very small pieces to work well. Start with air-dry bells, mittens, and salt dough hearts, and save detailed figurines and tiny pieces for a second session.
loved these ideas? ✿
Save this guide for later
Pin it to your board so it’s there when you’re ready to recreate it.

Curated by
Hey! I'm Sanaullah — visual curator and content creator. I search, curate, and test the best aesthetic ideas across Pinterest so you can easily transform your living space, style daily outfits, and try simple creative DIYs without the overwhelm.