
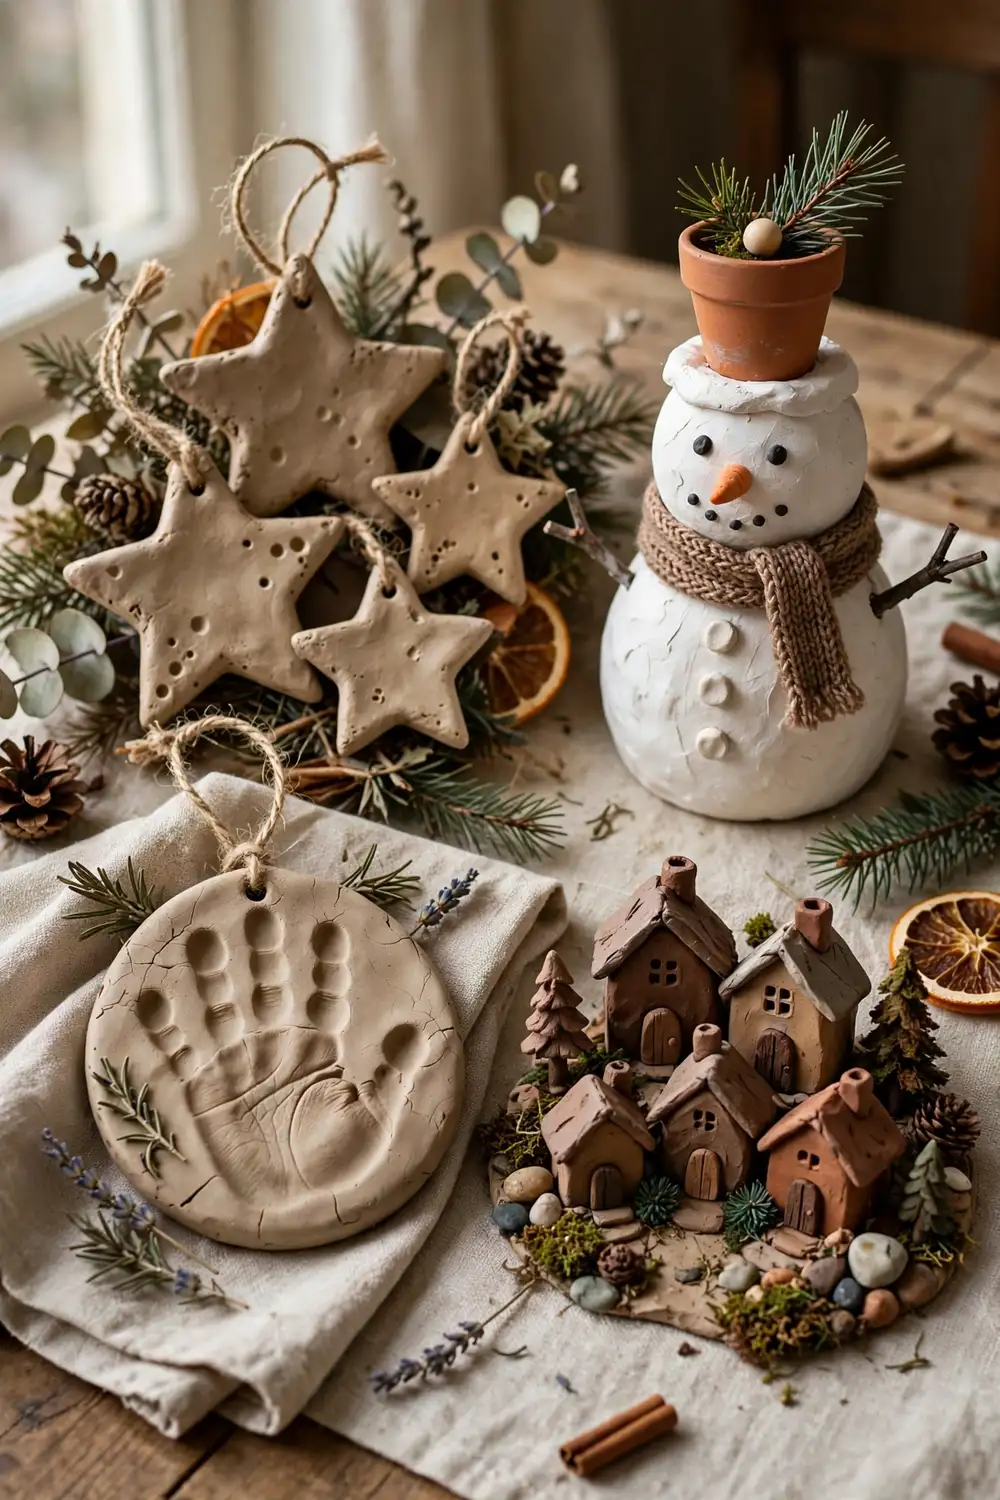
A tree dressed only with shop-bought ornaments can feel like a catalogue page, because every bauble looks the same as every other house on the street. A tree dressed with clay crafts feels personal, because every star, snowman, and handprint carries a fingerprint, a brushstroke, or a shape you made yourself. Most clay christmas crafts fail in the same way: people buy the wrong clay, skip the drying time, or paint too early, and end up with cracked ornaments and a sticky mess. This list works the other way around. These 22 clay christmas crafts are grouped by clay type, air-dry ornaments, polymer ornaments, terracotta pot crafts, handprint keepsakes, clay villages, and clay home decor, and every make comes with real steps, so you can pick one type, finish it, and move on. If you want the fullest version of this list, start with the easiest group and work toward the fiddliest, and your whole house will look handmade by Christmas Eve, not half finished.
- The key takeaway: One clay type per session beats a mixed pile. A table full of finished air-dry stars or a finished set of polymer ornaments looks like a plan, while five half-dried pieces in different clays look like a mess.
- The detail most people miss: Drying time matters more than shaping time. Clay that is painted or hung before it is fully dry cracks, warps, and loses its paint, while clay that dries slowly and fully holds its shape for years.
- What it costs or how long it takes: Most of these 22 ideas cost $3 to $20 in supplies, and each takes 30 minutes to 3 hours of active work plus drying time. Clay christmas crafts are often the cheapest handmade decorations in the house, because a single block of clay makes a whole set of ornaments.
At a glance
| Group | Ideas | Materials | Best for |
|---|---|---|---|
| Air-Dry Clay Ornaments | 01-04 | Air-dry clay, cutters, paint | Trees, gifts, and garlands |
| Polymer Clay Ornaments | 05-08 | Polymer clay, oven, paint | Detailed ornaments and figurines |
| Terracotta Pot Crafts | 09-12 | Terracotta pots, paint, glue | Porches, mantels, and gifts |
| Handprint and Keepsake Clay | 13-16 | Air-dry clay, salt dough, paint | Kids, grandparents, and keepsakes |
| Clay Villages and Scenes | 17-19 | Clay, paint, moss, lights | Mantels, windowsills, and tables |
| Clay Home Decor | 20-22 | Clay, paint, ribbon, candles | Tables, doors, and gift wrapping |
jump to an idea ↓
- 01 Air-Dry Clay Star Ornaments
- 02 Air-Dry Clay Snowflake Ornaments
- 03 Air-Dry Clay Baubles
- 04 Air-Dry Clay Gingerbread Ornaments
- 05 Polymer Clay Christmas Tree Ornaments
- 06 Polymer Clay Snowman Ornaments
- 07 Polymer Clay Reindeer Ornaments
- 08 Polymer Clay Angel Ornaments
- 09 Terracotta Pot Snowman
- 10 Terracotta Pot Santa
- 11 Terracotta Pot Reindeer
- 12 Terracotta Pot Christmas Tree
- 13 Clay Handprint Ornaments
- 14 Clay Paw Print Ornaments
- 15 Clay Footprint Reindeer
- 16 Salt Dough Keepsake Ornaments
- 17 Miniature Clay Christmas Village
- 18 Clay Nativity Scene
- 19 Clay Snowy Cottage
- 20 Clay Candle Holders
- 21 Clay Bead Garland
- 22 Clay Gift Tags
Air-Dry Clay Ornaments

01
Air-Dry Clay Star Ornaments
A tree dressed only in round baubles can look flat, because every ornament is the same shape. Air dry clay christmas ornaments in star shapes give the tree points and angles, because the clay stars catch light differently from every side. Steps: 1. Roll air-dry clay to about 5 mm thick on a sheet of baking paper. 2. Cut stars with a cookie cutter and poke a hanging hole near one point with a straw. 3. Dry flat for 24 to 48 hours, turning once, then paint and seal with varnish.
Try it: Roll the clay on baking paper, not straight on the table. Clay rolled on a bare table sticks and tears when you lift it, while clay on baking paper lifts cleanly.

02
Air-Dry Clay Snowflake Ornaments
A tree dressed only in flat paper snowflakes can look two-dimensional, because flat flakes have no depth. Air dry clay snowflake ornaments give the tree flakes with real weight and texture, because the clay holds stamped and pressed detail. Steps: 1. Roll air-dry clay to 5 mm thick and cut snowflakes with a snowflake cutter or a knife. 2. Press a lace doily or a stamp lightly into each flake for texture. 3. Poke a hanging hole, dry flat for 24 to 48 hours, then paint white or pale blue and seal.
Try it: Press the texture in before cutting, not after. A flake pressed after cutting stretches out of shape, while a sheet pressed first cuts cleanly.

03
Air-Dry Clay Baubles
A tree covered in identical shop baubles can look like a catalogue page, because identical baubles repeat with no variation. Clay ornaments diy baubles, round balls shaped by hand and painted in one colour family, give the tree baubles with handmade texture, because the clay surface is slightly uneven in a way factory baubles never are. Steps: 1. Roll air-dry clay into smooth balls about the size of a golf ball. 2. Flatten one side slightly so the bauble sits while drying, and poke a hanging hole through the top with a skewer. 3. Dry for 48 hours, paint in one colour family, and seal with varnish before hanging.
Try it: Paint the baubles in one colour family, all reds or all golds. Baubles in mixed colours look like a paint experiment, while one family reads as a set.

04
Air-Dry Clay Gingerbread Ornaments
A tree dressed with real gingerbread ornaments can look wonderful for a week and stale after it, because biscuits dry out and crumble. Clay gingerbread ornaments last for years, because the clay holds the shape and the paint holds the icing look. Steps: 1. Roll air-dry clay to 5 mm thick and cut gingerbread men with a cookie cutter. 2. Poke a hanging hole at the top and press small dots for buttons with a toothpick. 3. Dry flat for 24 to 48 hours, paint brown, then add white paint dots for icing and a smile.
Try it: Paint the icing details after the brown coat is fully dry. Icing painted onto wet brown smears, while icing on dry brown stays crisp like real piping.
Polymer Clay Ornaments

05
Polymer Clay Christmas Tree Ornaments
A tree dressed only in flat ornaments can feel two-dimensional, because flat shapes have no depth. Polymer clay christmas ornaments shaped as tiny trees give the tree ornaments with real dimension, because the polymer clay holds layered branches and tiny decorations. Steps: 1. Roll green polymer clay into a cone and press small balls around it as branches. 2. Add tiny coloured dots as baubles and a star on top. 3. Poke a hanging hole, bake following the clay packet instructions, cool fully, then seal with varnish.
Try it: Bake on baking paper, not on a bare tray. Polymer clay baked on a bare tray can pick up shine marks, while baking paper keeps the base clean.

06
Polymer Clay Snowman Ornaments
A tree with only stars and baubles can feel like it forgot the characters, because children look for faces after Santa. Clay snowman ornaments, two stacked balls with a carrot nose and a scarf, hang as small friendly faces, because the polymer clay holds tiny detail. Steps: 1. Roll two white polymer clay balls, one large and one small, and stack them. 2. Add black dots for eyes and buttons, an orange cone for a nose, and a thin rolled strip as a scarf. 3. Poke a hanging hole through the top, bake following the packet instructions, and cool fully before hanging.
Try it: Keep the snowman small, no taller than 5 cm. A large polymer snowman is heavy and pulls the branch down, while a small one hangs neatly.

07
Polymer Clay Reindeer Ornaments
A mantel with only candles and garland can look soft, because nothing on it stands upright with a shape. A clay reindeer ornament, a small brown body with antlers and a red nose, gives the tree a figure with character, because the polymer clay holds the antler shape. Steps: 1. Roll a brown polymer clay oval for the body and a smaller ball for the head. 2. Add two thin antler shapes, black dot eyes, and a red nose. 3. Poke a hanging hole, bake following the packet instructions, cool fully, then seal.
Try it: Make the antlers thick, not thin. Thin polymer antlers snap in the oven or in storage, while thick antlers survive both.

08
Polymer Clay Angel Ornaments
A tree topped with a star and covered in baubles can feel like it forgot the angels, because angels are the figure children look for after Santa. A clay angel ornament, a dress of folded clay, a round head, and two wing shapes, hangs as a small guardian, because the polymer clay reads as soft and the wings read as light. Steps: 1. Shape a cone of white or cream polymer clay for the dress. 2. Add a small round head, two flat wing shapes, and a tiny halo. 3. Poke a hanging hole, bake following the packet instructions, cool fully, then paint the details.
Try it: Hang clay angels on front branches, not hidden inside. A clay angel tucked inside the tree disappears, while an angel on the front reads as a guardian of the whole tree.
Terracotta Pot Crafts

09
Terracotta Pot Snowman
A porch with only a wreath can look bare, because the door gets all the decoration and the steps get none. A clay pot snowman, stacked terracotta pots painted white with a black hat, gives the porch a figure, because the pots read as snowballs. Steps: 1. Paint three terracotta pots white, one large, one medium, and one small, and let them dry. 2. Stack them upside down, largest at the bottom, gluing each pot to the next. 3. Add black dot eyes, an orange nose, a scarf, and a black pot as a hat on top.
Try it: Glue the pots together, do not just stack them. Unglued pots topple in wind, while glued pots stand all season on the porch.

10
Terracotta Pot Santa
A mantel with only garland can look like it forgot Santa, because the mantel is the gallery every family actually looks at. A christmas pot painting idea that turns a terracotta pot into Santa, red hat on top and a white beard below, gives the mantel a face children love, because the beard is soft and the hat is bright. Steps: 1. Paint a terracotta pot red on the top third and skin colour or white below. 2. Glue cotton wool around the bottom two thirds as a beard. 3. Add dot eyes, a pink nose, and a white pom-pom on the hat, then stand the Santa on the mantel.
Try it: Paint the pot before gluing the beard, not after. Paint on a bearded pot smudges the cotton wool, while paint on a bare pot stays even.

11
Terracotta Pot Reindeer
A yard or porch with only lights can look like an outline, because lights alone give glow but no shape. A christmas crafts with terra cotta pots reindeer, a pot body with antlers and a red nose, gives the display a figure, because the reindeer shape reads from across the yard. Steps: 1. Paint a terracotta pot brown and let it dry. 2. Glue two antler shapes cut from card or twigs to the top rim. 3. Add dot eyes and a red pom-pom nose, and stand the reindeer where it will be seen.
Try it: Use a wide pot, not a tall narrow one. A tall narrow pot topples easily, while a wide pot holds the reindeer upright.
12
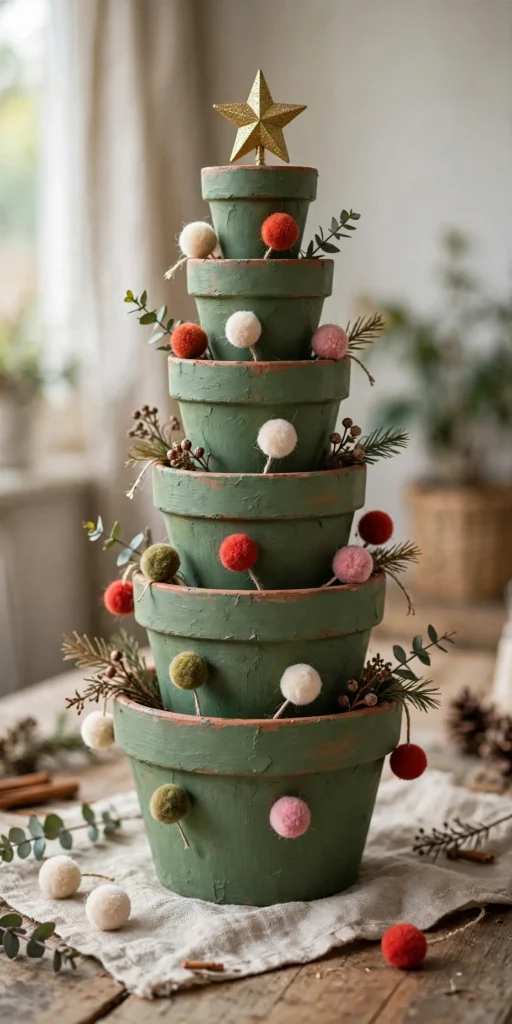
Terracotta Pot Christmas Tree
A table with only a candle can look bare, because a candle alone gives light but no Christmas shape. A terracotta pot christmas tree, stacked pots painted green with a star on top, gives the table a tree that lasts for years, because the pots hold their shape. Steps: 1. Paint three terracotta pots green, one large, one medium, and one small, and let them dry. 2. Stack them upside down, largest at the bottom, gluing each pot to the next. 3. Add small pom-poms as baubles and a star on top.
Try it: Stack the pots upside down, rim down. Pots stacked rim up collect dust and look like plant pots, while pots stacked rim down read as a tree.
Handprint and Keepsake Clay

13
Clay Handprint Ornaments
A tree dressed only with shop ornaments can feel impersonal, because nothing on it was made by anyone in the house. Clay handprint ornaments, a child’s hand pressed into clay and painted, give the tree ornaments with a story, because the handprint is dated and personal. Steps: 1. Roll air-dry clay to about 1 cm thick on baking paper. 2. Press the child’s hand firmly into the clay and trim around it with a knife. 3. Poke a hanging hole, dry flat for 48 hours, then paint and write the year on the back.
Try it: Press the hand once, firmly, and do not re-press. A second press blurs the print, while one firm press keeps every finger clear.

14
Clay Paw Print Ornaments
A tree that celebrates the whole family can feel incomplete if the pets are left out, because pets are family too. Clay paw print ornaments, a pet’s paw pressed into clay and painted, give the tree ornaments that include every member of the house. Steps: 1. Roll air-dry clay to about 1 cm thick on baking paper. 2. Press the pet’s paw gently into the clay and trim around it into a circle or heart. 3. Poke a hanging hole, dry flat for 48 hours, then paint and write the pet’s name on the back.
Try it: Press the paw while the pet is calm, after a walk or a nap. A wriggling paw smears the print, while a calm paw gives a clean impression.

15
Clay Footprint Reindeer
A wall or mantel with only framed photos can look formal, because photos alone give faces but no handmade charm. A clay footprint reindeer, a baby’s footprint turned into a reindeer with antlers and a red nose, gives the display a keepsake, because the footprint is the reindeer’s face. Steps: 1. Roll air-dry clay to about 1 cm thick and press the baby’s foot into it. 2. Trim around the print, poke a hanging hole, and dry flat for 48 hours. 3. Paint the print brown, add antler shapes above the toes, dot eyes, and a red nose on the heel.
Try it: Paint the antlers after the brown coat is fully dry. Antlers painted onto wet brown smear, while antlers on dry brown stay crisp.

16
Salt Dough Keepsake Ornaments
A keepsake that costs a fortune can feel out of reach, because specialist clay and kits add up. Homemade clay for ornaments, salt dough made from flour, salt, and water, gives the same keepsake for almost nothing, because the ingredients are already in the kitchen. Steps: 1. Mix 2 cups of flour, 1 cup of salt, and 1 cup of water into a smooth dough. 2. Roll to 5 mm thick, cut shapes, and poke hanging holes. 3. Bake at a low oven temperature until hard, cool fully, then paint and seal with varnish.
Try it: Bake salt dough low and slow, not hot and fast. A hot oven puffs and cracks salt dough, while a low oven dries it hard and flat.
Clay Villages and Scenes

17
Miniature Clay Christmas Village
A windowsill with only candles can look plain, because candles alone give light but no shape. A christmas clay ideas village, a row of tiny clay houses with lit windows, gives the sill a skyline, because the candlelight behind the houses makes every window glow. Steps: 1. Shape small clay houses with pitched roofs, one at a time, and cut small square windows in each. 2. Dry or bake following the clay instructions, then paint the houses in muted colours. 3. Stand the houses in a row with a battery candle behind them, and the windows will glow like a real village at night.
Try it: Keep the houses joined at the base or glued to one long board, not separate pieces. Separate houses fall over one by one, while a joined row stands on its own.

18
Clay Nativity Scene
A mantel with only garland can feel like it forgot the story, because garland alone gives greenery but no meaning. A clay nativity scene, small clay figures of Mary, Joseph, and the baby in a stable, gives the mantel the Christmas story itself, because the figures are handmade and personal. Steps: 1. Shape simple clay figures, one at a time, starting with the stable. 2. Dry or bake following the clay instructions, then paint the figures in soft colours. 3. Arrange the figures in the stable on the mantel, with the baby at the centre.
Try it: Make the figures simple, not detailed. A simple clay figure reads as charming, while a fiddly one that fails reads as broken.

19
Clay Snowy Cottage
A table centrepiece made only from candles can look plain, because candles alone give light but no shape. A clay snowy cottage, a small clay house with a snow-dusted roof and a glowing window, gives the table a centrepiece with a story, because guests ask about it. Steps: 1. Shape a small clay cottage with a pitched roof and one window. 2. Dry or bake following the clay instructions, then paint the walls cream and dust the roof with white paint as snow. 3. Place a battery candle inside or behind the cottage so the window glows.
Try it: Use a battery candle, never a real flame, inside a clay cottage. Real flames and painted clay are a fire risk, while battery candles glow safely all evening.
Clay Home Decor

20
Clay Candle Holders
A table dressed only with flat ornaments can feel two-dimensional, because flat shapes have no depth. Air dry clay decorations as candle holders, small clay cups with a candle inside, give the table warm pools of light, because the clay glows from within when the candle is lit. Steps: 1. Shape a small clay cup around a jar or a candle, leaving the top open. 2. Press texture into the outside with a stamp or lace. 3. Dry fully for 48 hours, paint, seal, and place a battery candle or a tealight inside.
Try it: Use battery candles for clay holders used near curtains or paper. Real flames near soft furnishings are a fire risk, while battery candles glow safely all evening.
21
Clay Bead Garland
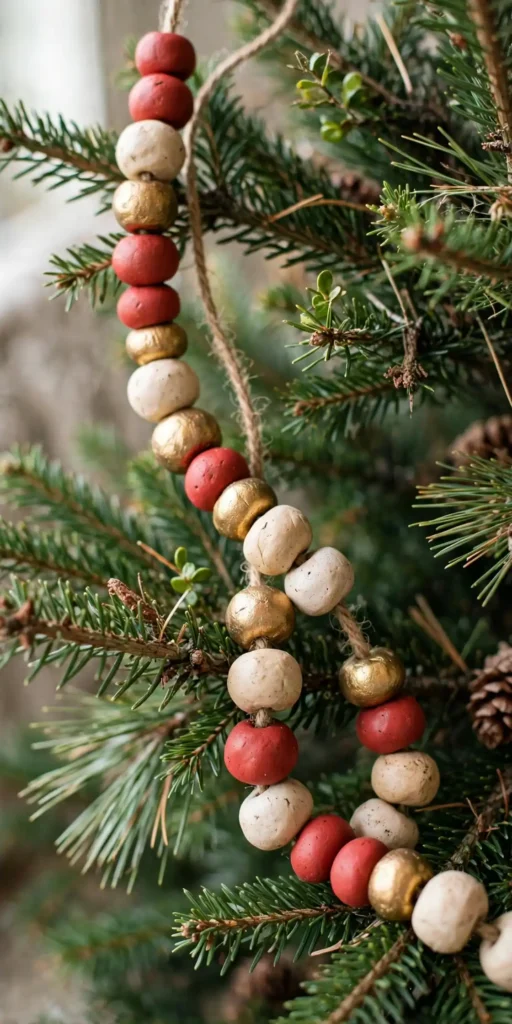
A tree dressed only in tinsel can look flat, because tinsel gives shine but no texture. A clay bead garland, hand-rolled clay beads strung on twine, gives the tree texture, because the beads catch light differently from every side. Steps: 1. Roll air-dry or polymer clay into small beads and poke a hole through each with a skewer. 2. Dry or bake following the clay instructions, then paint the beads in one colour family. 3. String the beads on twine, knotting between every few beads so they stay spaced.
Try it: Knot between every few beads, not just at the ends. Beads without knots slide into a clump, while knotted beads stay evenly spaced on the tree.

22
Clay Gift Tags
A gift wrapped beautifully can feel unfinished, because a paper tag tears and looks like an afterthought. Clay gift tags, small clay shapes stamped with a name, give the gift a tag the receiver keeps, because the clay tag becomes a keepsake itself. Steps: 1. Roll air-dry clay to 3 mm thick and cut small rectangles or stars. 2. Stamp or write the receiver’s name into the clay with a toothpick. 3. Poke a hanging hole, dry flat for 24 hours, paint, seal, and tie to the gift with ribbon.
Try it: Stamp the name before the clay dries, not after. A name stamped into soft clay stays readable, while a name scratched into dry clay looks rough.
Pro tip: Finish one clay type completely before starting the next. A table full of finished air-dry stars, a finished set of polymer ornaments, and a finished terracotta snowman make the house feel done, while five half-dried pieces in different clays make it feel chaotic, even if you spent the same hours.
Three rules for clay crafts that look intentional, not homemade
Most clay Christmas crafts look unfinished for the same three reasons, and all three are fixable.
- First, limit the palette. One or two colours per project, repeated consistently, look intentional, while a project in unrelated colours looks like leftovers.
- Second, finish every edge. Smooth edges, sealed paint, and trimmed holes are what separate a clay craft from a lump of clay, because the finish is what the eye reads first.
- Third, respect the drying time. Clay that is painted, sealed, or hung before it is fully dry cracks and warps, so plan the drying days into the project, not after it.
Storing and reusing your clay Christmas crafts
Clay Christmas crafts last for years if you store them properly, and the storage step is part of the making, not an afterthought.
- First, store ornaments in their own boxes. Clay ornaments chip against each other, so tissue paper and a box per shape are worth the minute they take.
- Second, store flat pieces flat. Handprint ornaments and gift tags warp when stacked on edge, so keep them flat between sheets of card in a folder.
- Third, keep clay dry and away from damp. Clay softens, spots, and grows mould in a damp attic, so store clay crafts in a dry cupboard, and keep them away from direct sunlight, which fades colour over time.
Questions readers ask
What are the easiest clay christmas crafts for beginners?
The easiest clay christmas crafts for beginners are air-dry clay star and snowflake ornaments, because all three need only clay, a cutter, and paint, and mistakes hide easily under more paint. Start with stars, since one rolled sheet makes a whole set of ornaments in under an hour plus drying time.
How do I make clay christmas ornaments?
You make clay christmas ornaments by choosing one clay type, air-dry, polymer, or salt dough, and following its steps with the right drying or baking method for the job. A making clay ornaments project starts with rolling the clay evenly, cutting clean shapes, and poking hanging holes before drying, since holes poked after drying crack the ornament.
What clay is best for Christmas ornaments?
Air-dry clay is best for simple ornaments and keepsakes, polymer clay is best for detailed ornaments and figurines, and salt dough is best for cheap kids projects, because each clay suits a different level of detail and budget. Using the right clay for the project is the single biggest difference between a craft that works and one that cracks.
Can kids make clay Christmas crafts?
Yes, kids can make clay Christmas crafts, and the best projects are air-dry star ornaments, handprint keepsakes, and terracotta pot snowmen, plus salt dough shapes, because all of them are safe, forgiving, and genuinely useful as decorations. Keep ovens, craft knives, and hot glue for adults, and let children choose colours and placements.
How long do clay Christmas ornaments take to dry?
Air-dry clay ornaments take 24 to 48 hours to dry fully, depending on thickness, while polymer clay ornaments bake in under an hour following the packet instructions. A clay ornament that feels dry on the outside can still be damp inside, so wait the full drying time before painting or sealing.
Do I need to seal clay Christmas ornaments?
Yes, you should seal clay Christmas ornaments with varnish or a clear sealant, because sealing protects the paint, stops moisture damage, and keeps the ornament looking new for years. Air-dry and salt dough ornaments need sealing most, while polymer clay ornaments benefit from a light seal as well.
What is the difference between air-dry clay and polymer clay?
Air-dry clay hardens by drying in the air over 24 to 48 hours and suits simple ornaments and keepsakes, while polymer clay hardens by baking in an oven and suits detailed ornaments and figurines. Air-dry clay is cheaper and easier for kids, while polymer clay holds finer detail and is stronger once baked.
How do I store clay Christmas crafts so they last?
You store clay Christmas crafts so they last by keeping ornaments in their own tissue-lined boxes, storing flat pieces flat between sheets of card, and keeping everything in a dry cupboard away from damp and sunlight. Stored this way, clay ornaments, handprints, and villages will last for many seasons.
People Also Ask
What is the 70/30 rule for clay Christmas crafts?
The 70/30 rule for clay Christmas crafts means roughly 70 percent of the display stays as it is, and 30 percent carries clay decoration. The rule is a guide, not a law, but a room that follows it will read as festive rather than cluttered.
How do I make my clay crafts look shop bought, not homemade?
You make your clay crafts look shop bought, not homemade, by rolling evenly, smoothing every edge, sealing the paint, and keeping one palette across each project. A craft with smooth edges, sealed paint, and a clear palette reads as designed, while rough edges and unsealed paint read as a school project.
What clay Christmas crafts should beginners avoid?
Beginners should avoid detailed polymer figurines and miniature clay villages on a first attempt, because each of those needs precise shaping or many small pieces to work well. Start with air-dry stars, handprints, and terracotta pot crafts, and save detailed figurines and villages for a second session.
loved these ideas? ✿
Save this guide for later
Pin it to your board so it’s there when you’re ready to recreate it.

Curated by
Hey! I'm Sanaullah — visual curator and content creator. I search, curate, and test the best aesthetic ideas across Pinterest so you can easily transform your living space, style daily outfits, and try simple creative DIYs without the overwhelm.